Getting Started with the Minverse
This article provides a product overview, quick setup instructions and troubleshooting for the Minverse and its included accessories.
What's in the box?

The included power cord can be safely replaced by any IEC C13 cord that fits your local wall outlet.
Do not replace the AC/DC adapter that connects to the device.
For more information about the power supply, refer to the label attached to the AC/DC adapter.
Product overview
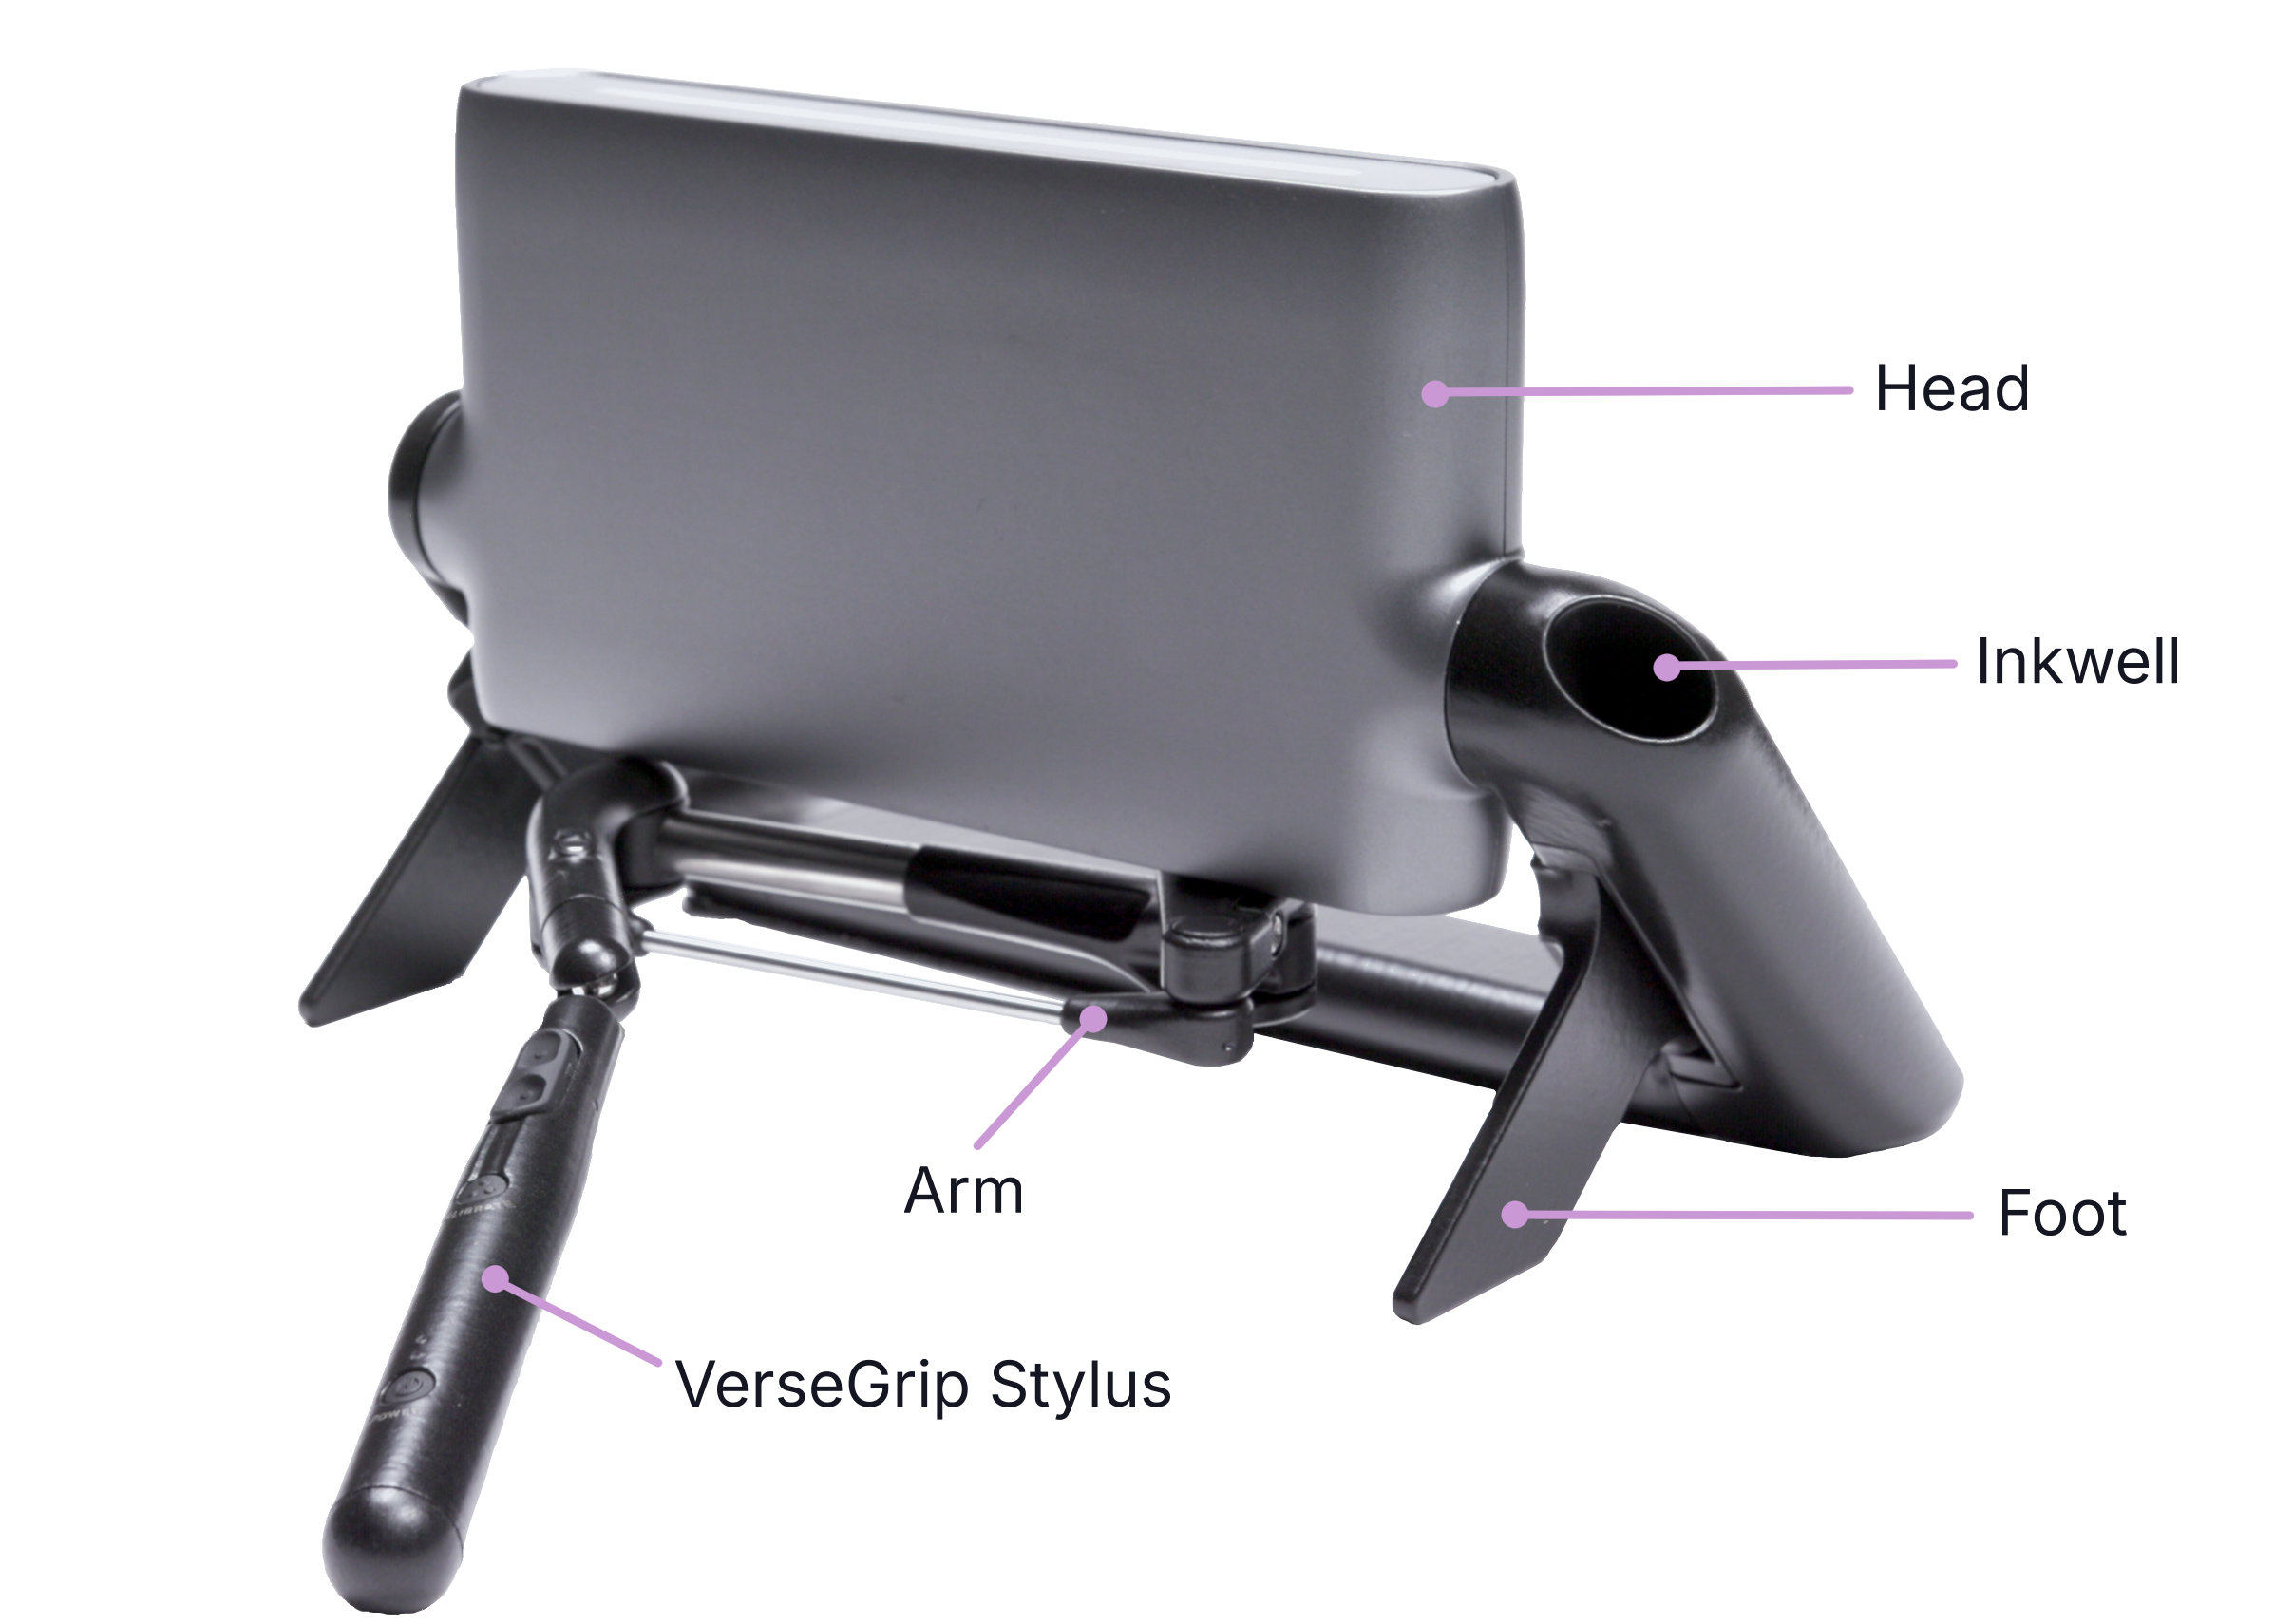
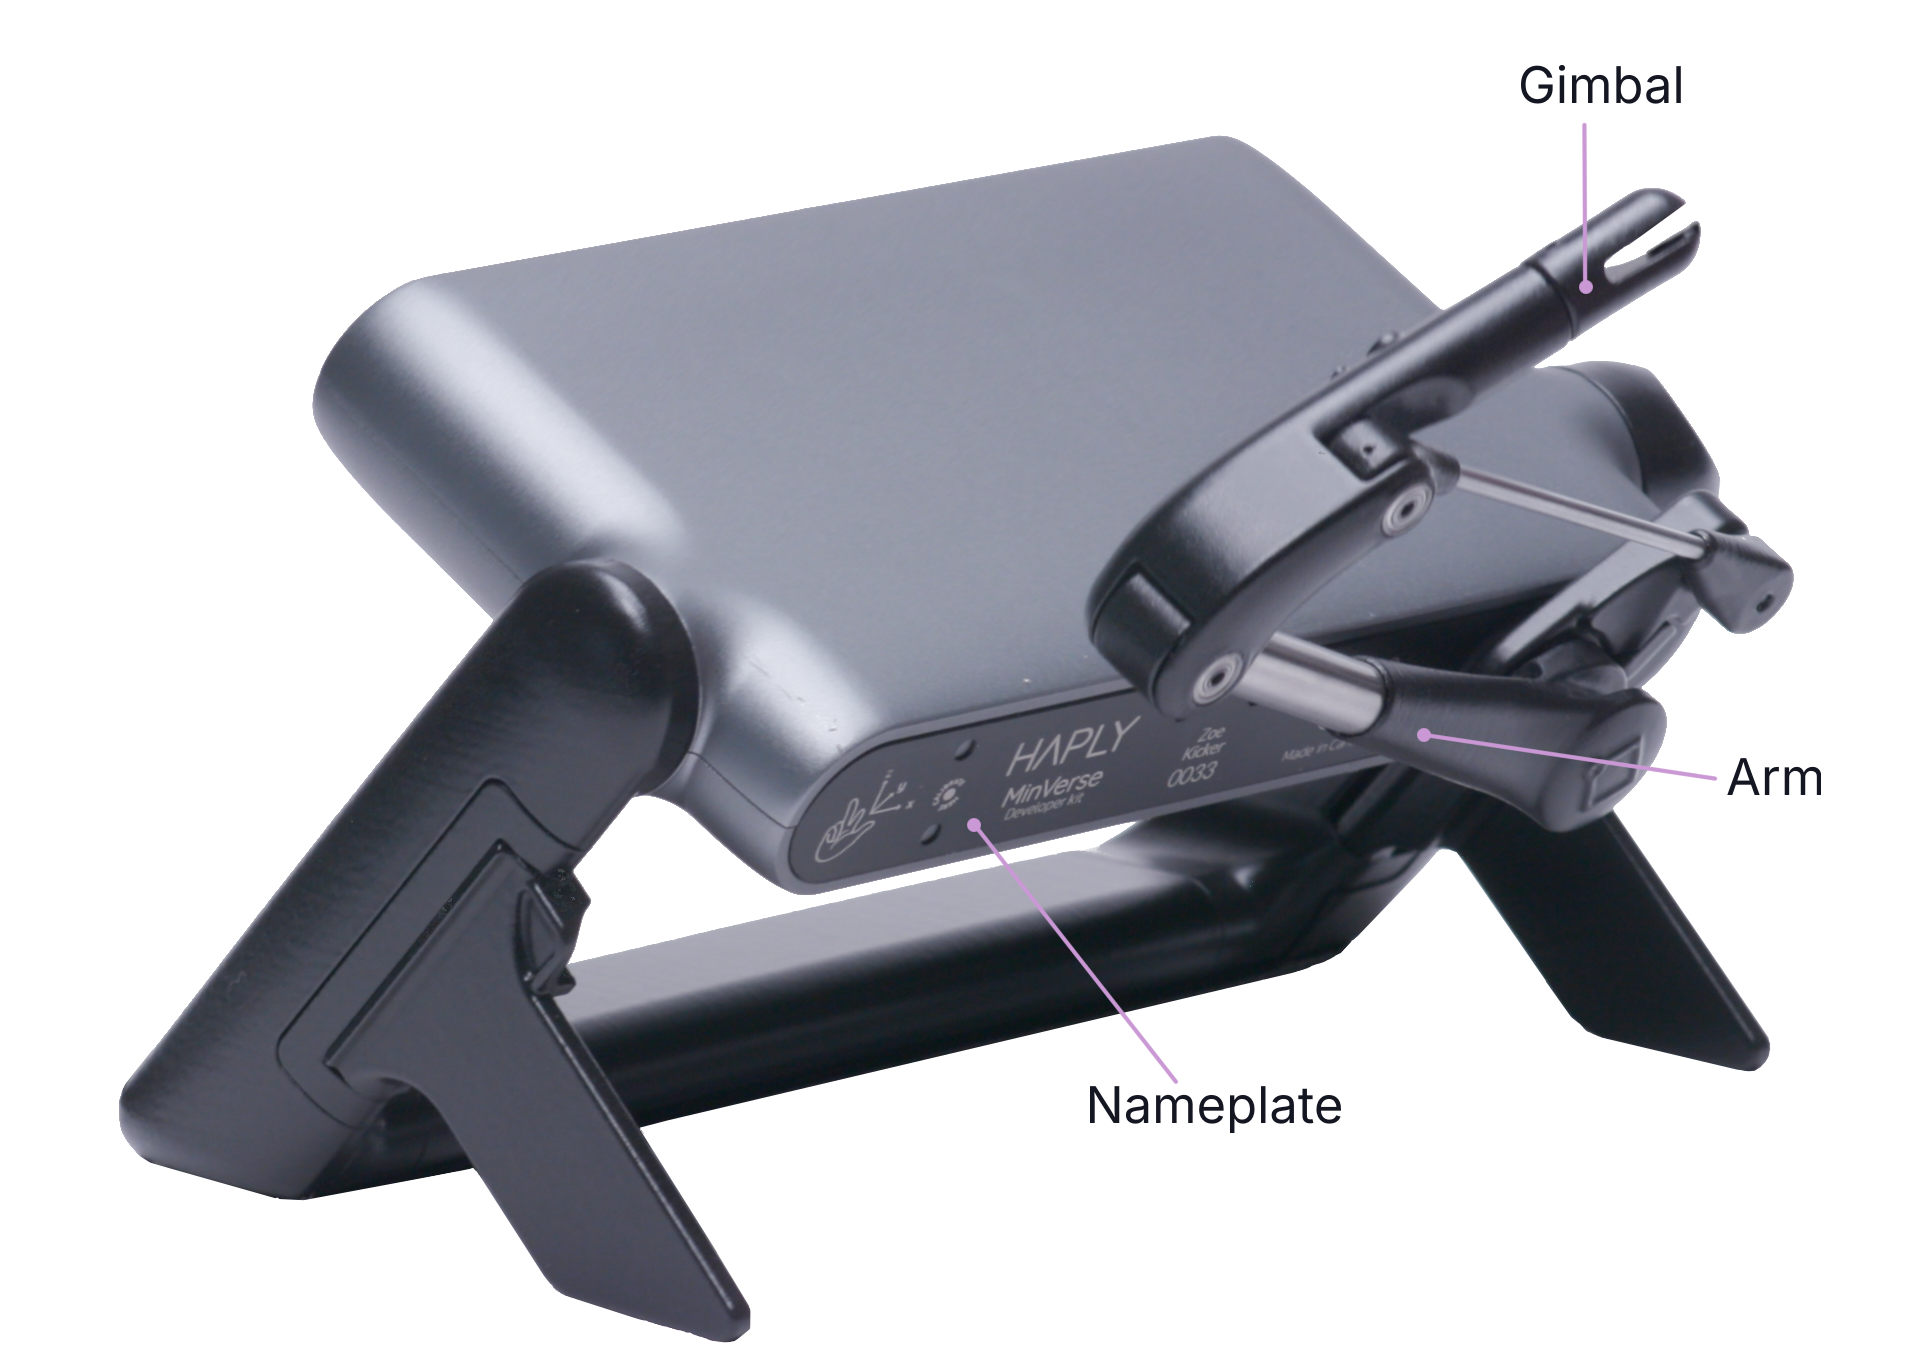
Minverse Parts
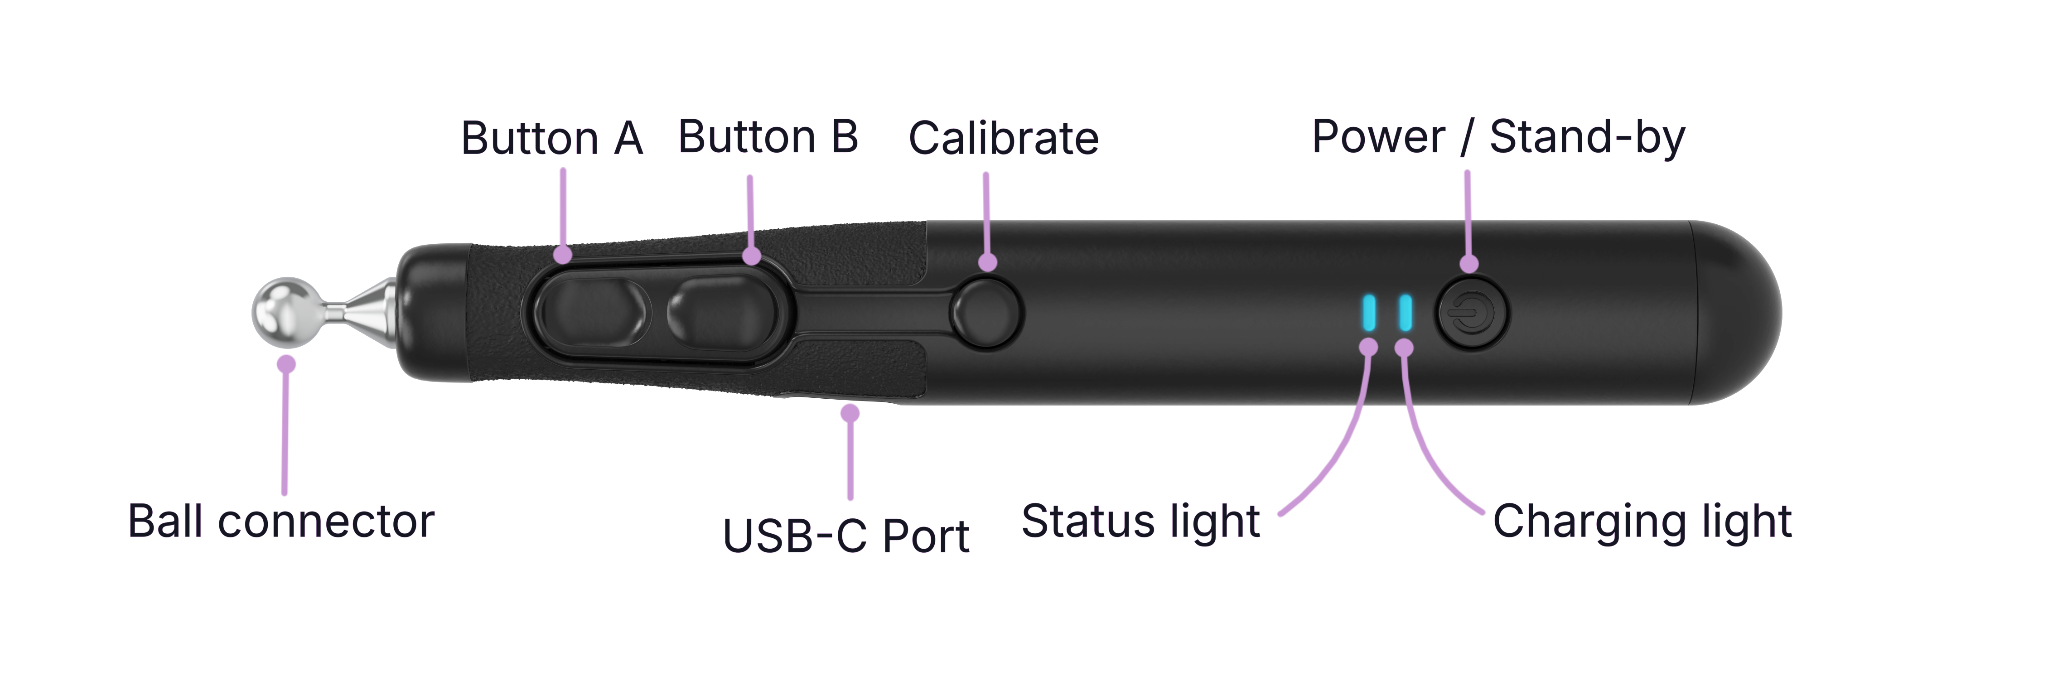
VerseGrip Stylus Parts
System Requirements
- Minimum hard disk space: 45MB for Haply Hub & Service installation
- Minimum display resolution: 1120 x 720
- Two (2) USB 2.0 compatible ports
Supported Operating Systems
- Windows 11, 64-bit
- Linux - Ubuntu 22.04 & 24.04
- macOS - Apple Silicon
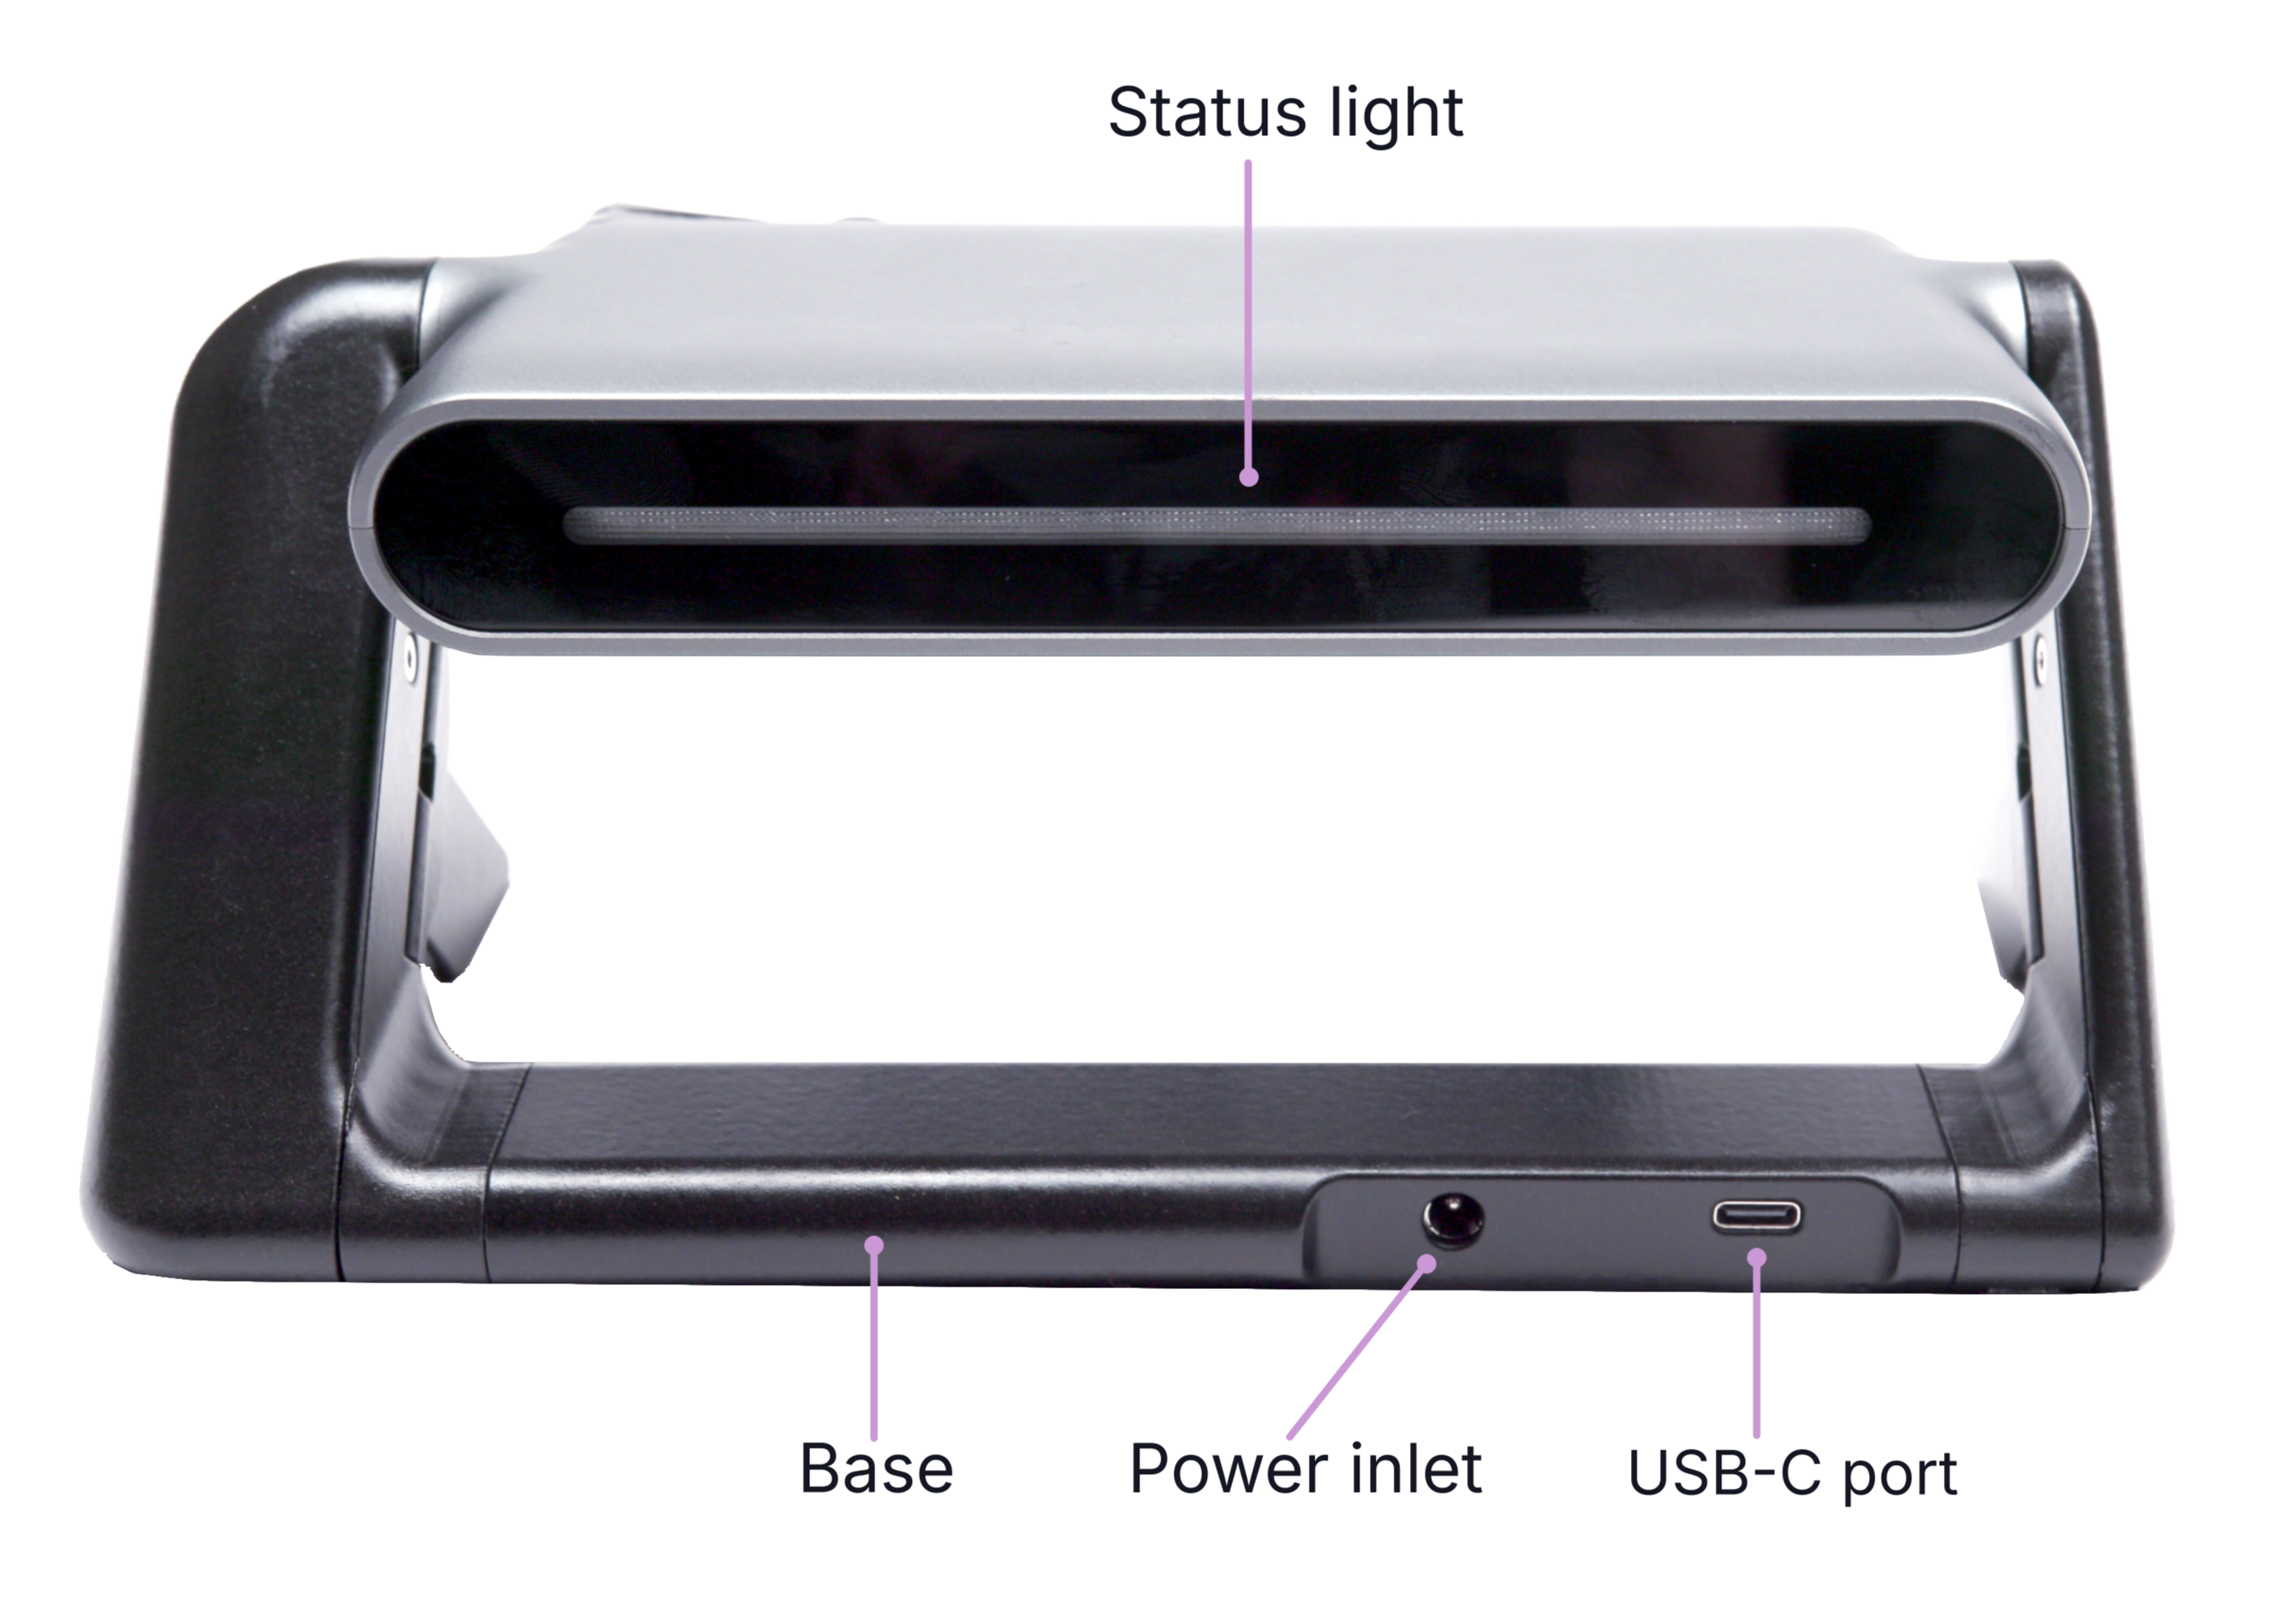
Status Lights
The status of your devices will be indicated by the LED lights on them, this will help diagnose any issues.
The status lights will show different colours and light sequences based on the operating mode.
Minverse status light
| Colour | Light sequence | State | Description |
|---|---|---|---|
| Off | Off | Unplugged | USB-C cable is disconnected |
| Off | Off | Unplugged | USB-C cable is disconnected |
| Red | Blink | No handshake | No connection to the service established |
| SOS Blink | Timeout | Communication timeout detected, no commands received from the service | |
| Yellow | Blink | Uncalibrated & unpowered | Power adapter disconnected and calibration required |
| Fade in/out | Uncalibrated | Device calibration required | |
| White | Solid | Idle | No control mode active |
| Blink | Idle & unpowered | Power adapter disconnected and no control mode active | |
| Purple | Transition from white | Idle & ungripped | User has let go of the grip while no control mode is active |
| Green | Solid | Force control | Device active in force control mode |
| Blink | Force control & unpowered | Power adapter disconnected and device in force control mode | |
| Cyan | Solid | Position control | Device active in position control mode |
| Blink | Position control & unpowered | Power adapter disconnected and device in position control mode | |
| Orange | Solid | Safety trigger | Instability has been detected, safety trigger has been activated |
VerseGrip Stylus status light
| Colour | Light sequence | Description |
|---|---|---|
| Yellow | Fast Fade in/out | Initial automated sensor reference calibration (lay VerseGrip still on table) |
| Fast Blink | Orientation calibration button pressed, calibration process started | |
| Solid | Orientation calibration button pressed, calibration complete | |
| Red | Fast Fade in/out | Adapter disconnected, no signal from host |
| Fast Blink | Power button pressed, shutdown process started | |
| Green | Fade in/out | Adapter connected, VerseGrip active data stream mode |
| Solid | Adapter connected, VerseGrip active data steam mode, USB power connected | |
| White | Fade in/out | Adapter connected, VerseGrip idle/standby mode no data streaming |
| Solid | Adapter connected, VerseGrip idle/standby mode no data streaming, USB power connected | |
| Orange | Flash (interlaced) | Battery low warning indication, notification is interlaced interlaced in current state |
| Double Flash (interlaced) | Battery critically low warning indication, notification is interlaced in current state | |
| Teal | Fade in/out | Device firmware update mode |
| (Brighter) | Solid | User buttons pressed, current indication color is solid and brighter |
| Off | No Light | Shutdown, power off |
VerseGrip Stylus charge indicator
| Colour | Light sequence | Description |
|---|---|---|
| Blue | Solid | Charging |
| Fast Blink | Charging near complete | |
| Off | No light | Charging complete |
Haply Hub
The Haply Hub, a fully integrated suite of configuration, visualization tools and feature exploration for all Haply devices that will act as a driver for your new device. The Haply Hub will also automatically install the latest version of the Haply Service.
You must install the Haply Hub so your computer can recognize your device.

Haply Hub
Download the latest version of the Haply Hub
Haply Service
Haply Service runs as a background server to enable real-time interactions and integrate our tactile devices with interactive applications.
Its functionalities include:
- Device Discovery and Management: Identifies and configures connected devices automatically.
- Ownership Management: Manages access to devices across multiple applications, ensuring smooth operation.
- Real-Time State Streaming: Provides updates on device states at high frequencies for precise control.
- Command Processing: Executes commands for force or position with high fidelity, enhancing the haptic feedback.
- Background Operation: Runs in the background, maintaining device readiness without user intervention.
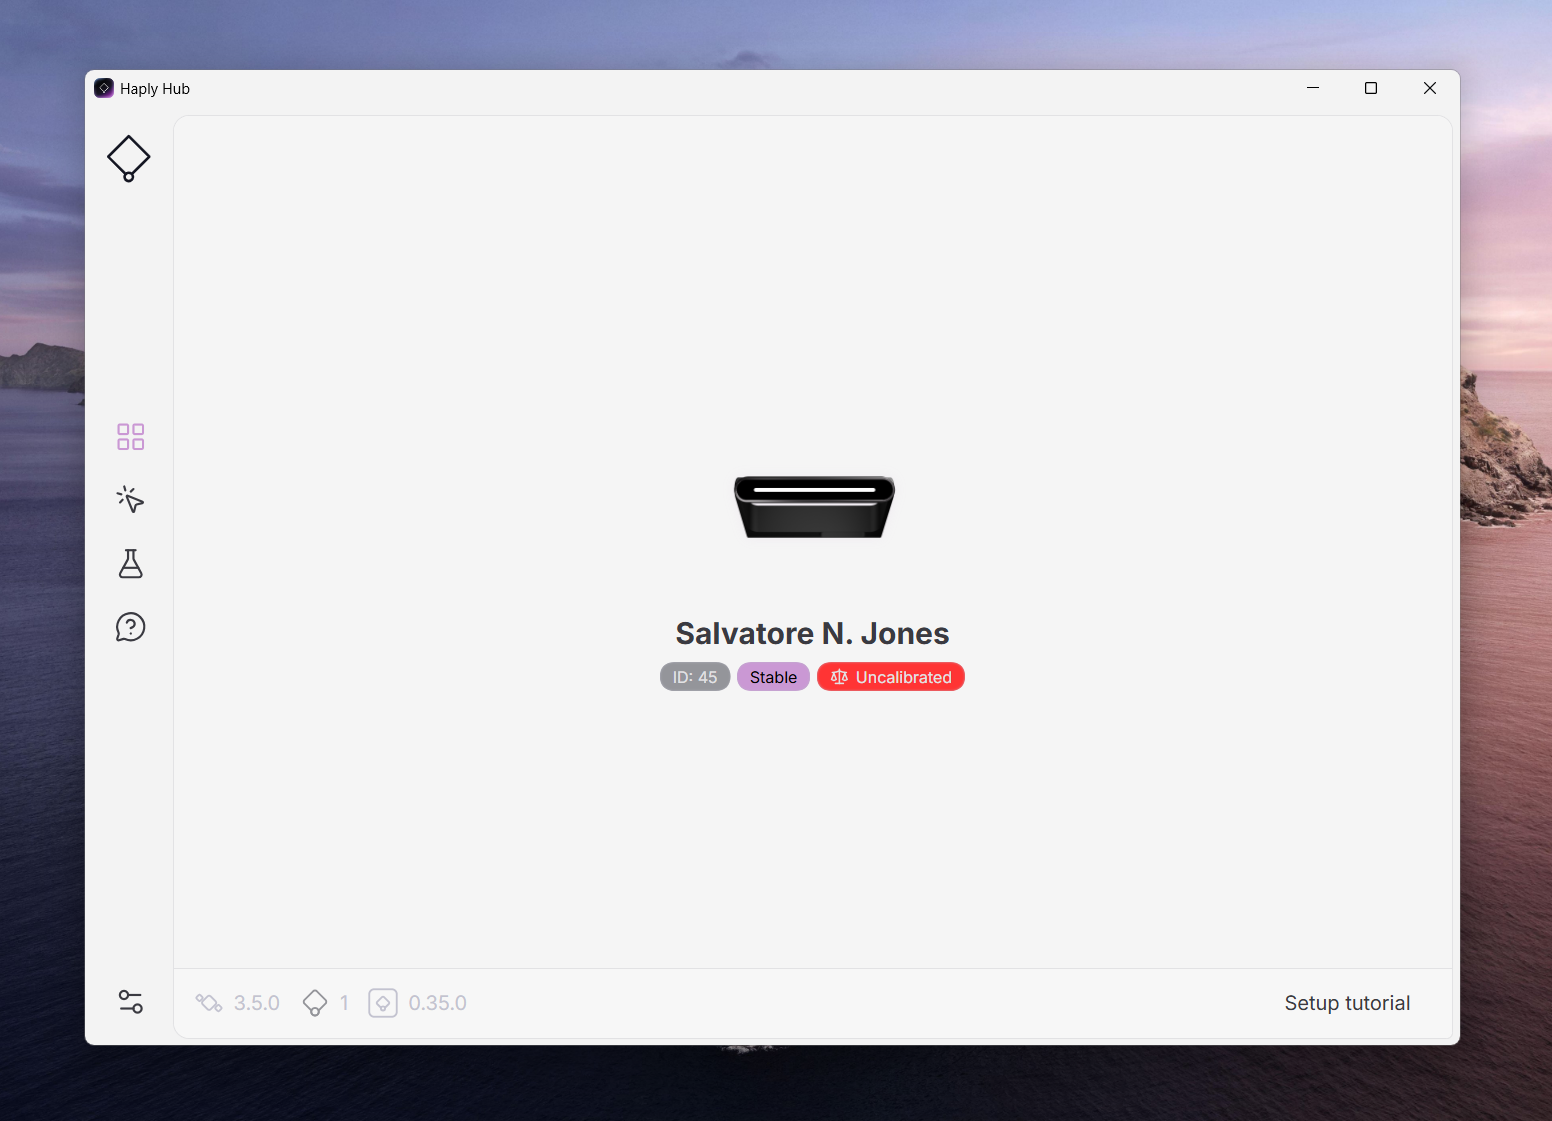
Overview of Haply Hub
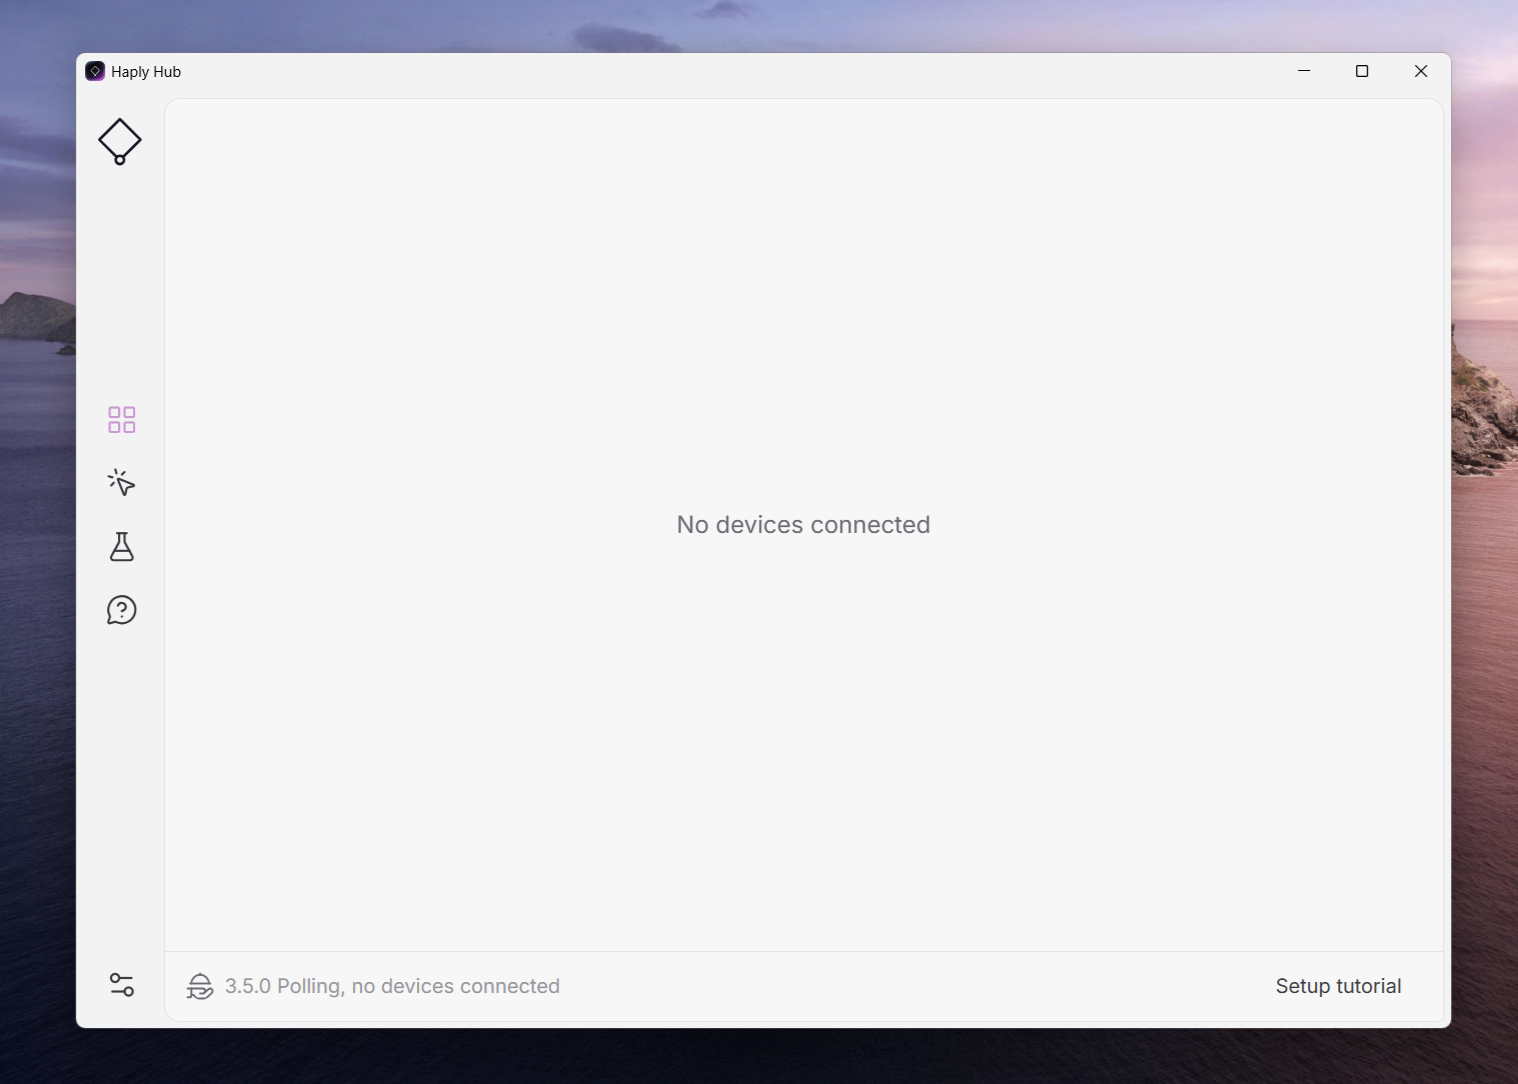
Your devices and handles will appear in the Overview tab as you plug them into your computer.
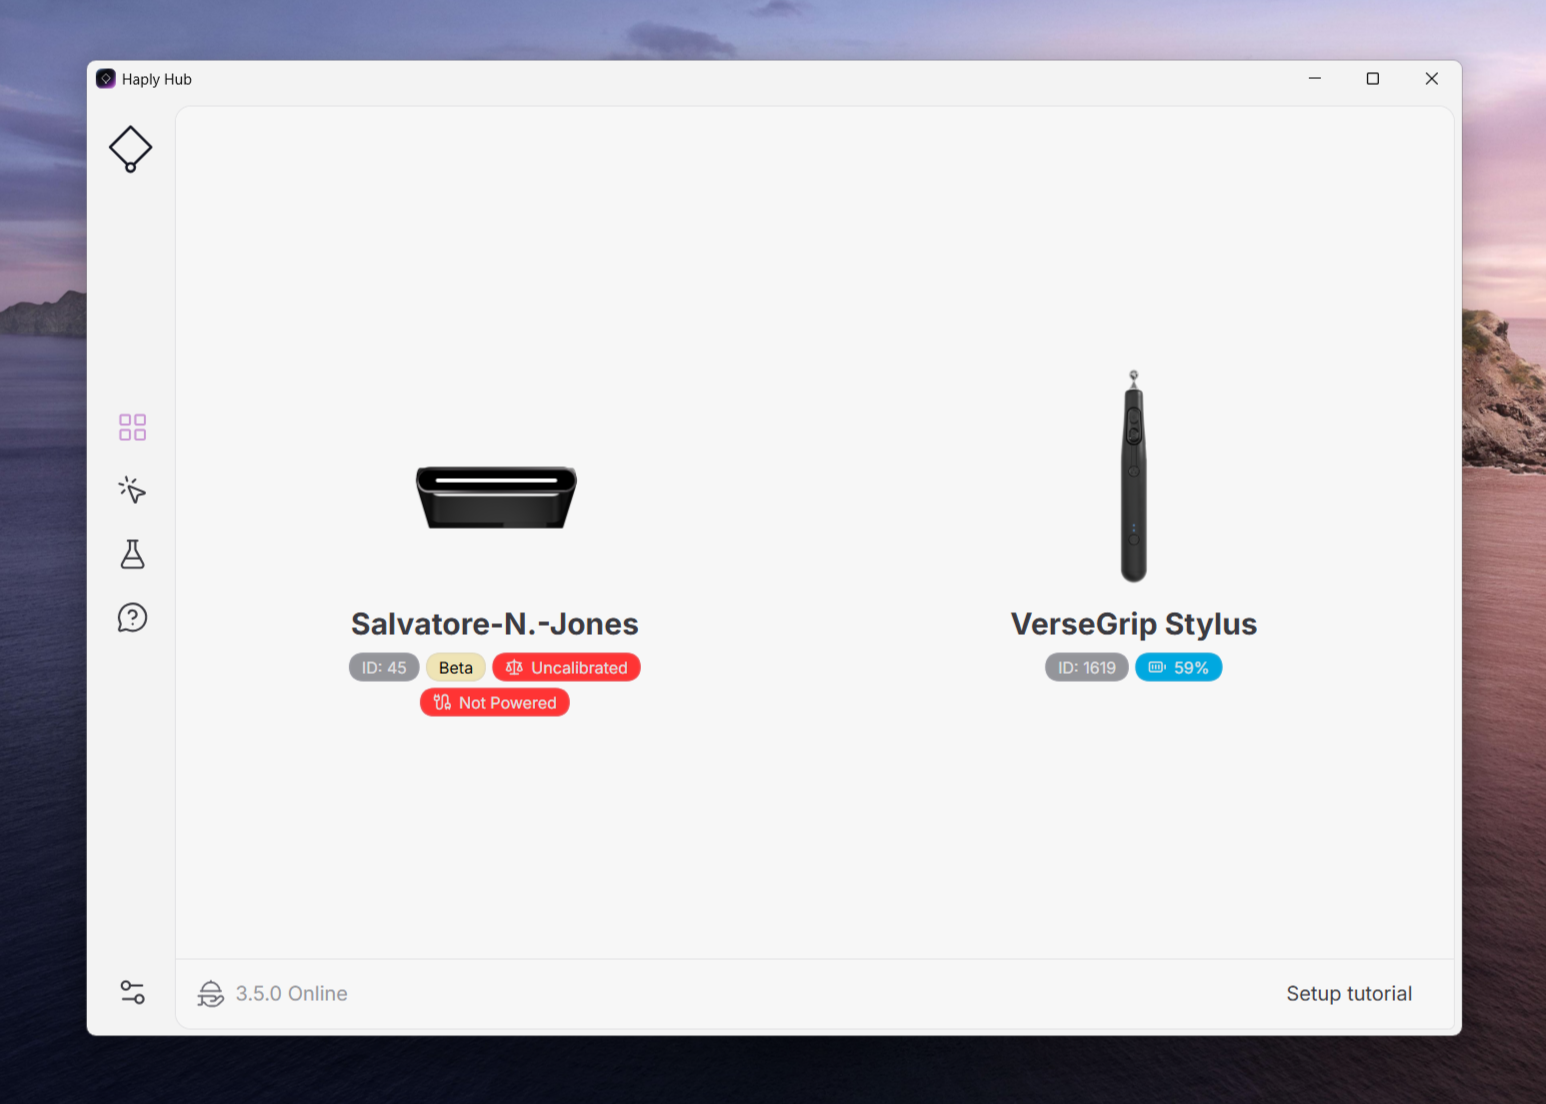
Other information about your device will be presented in the Overview tab when you click on your device or handle.
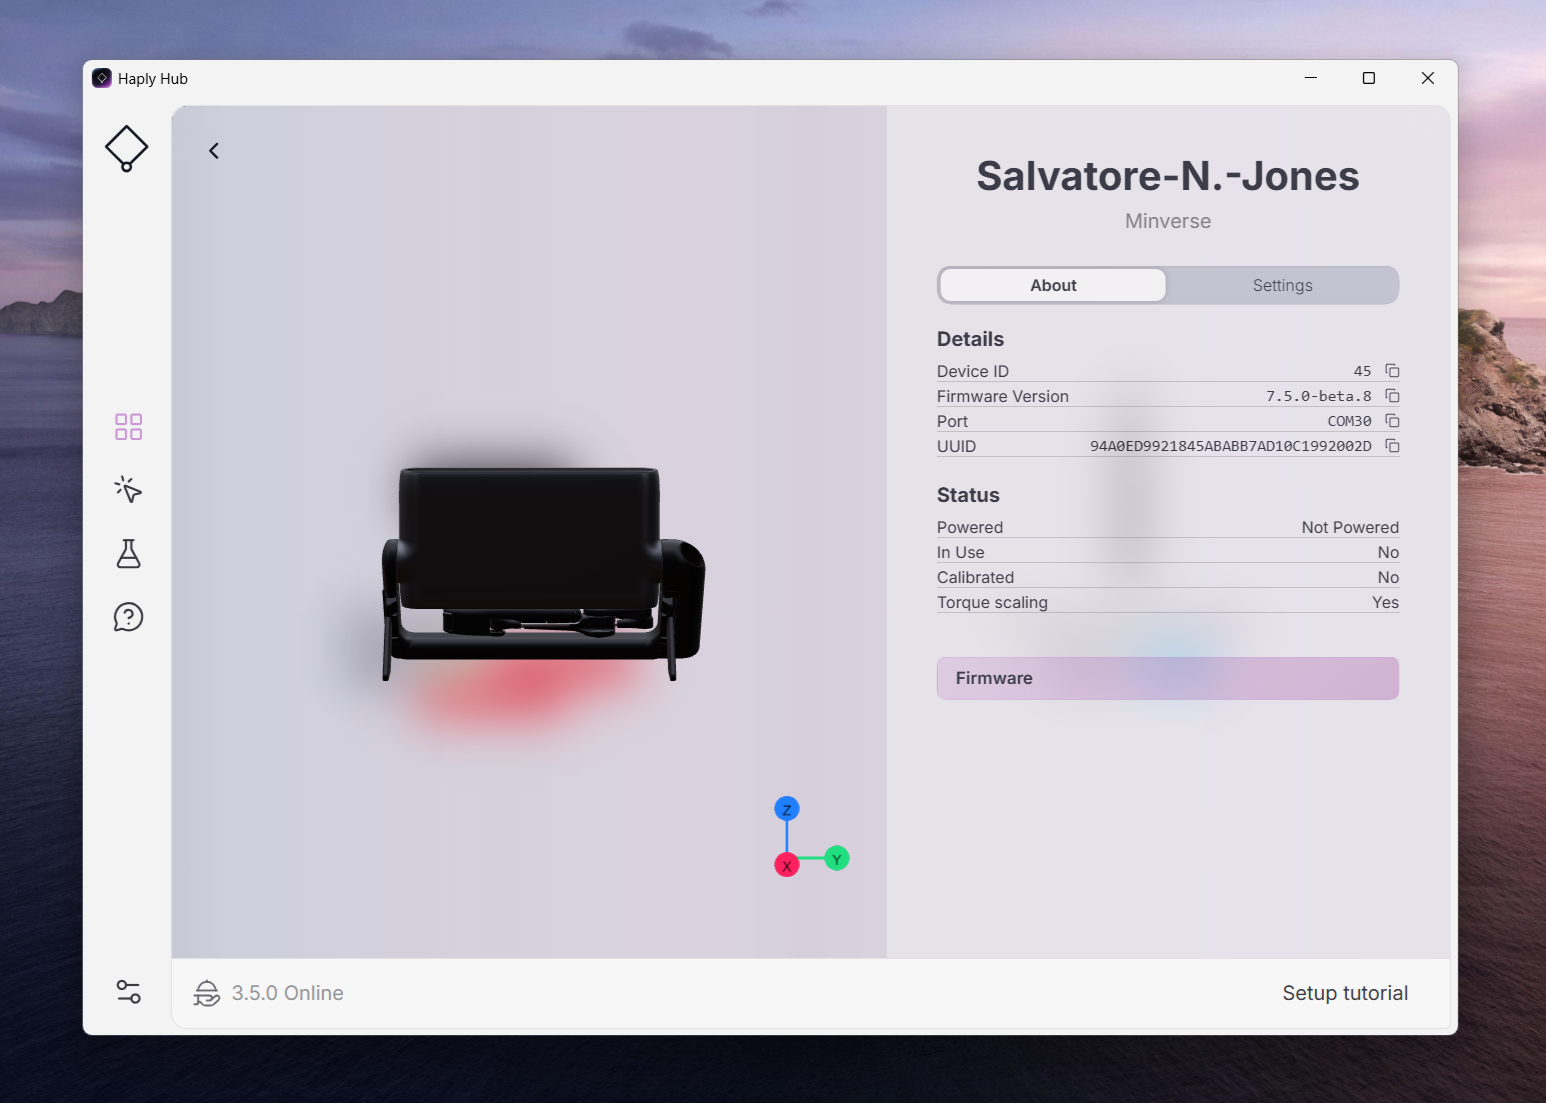
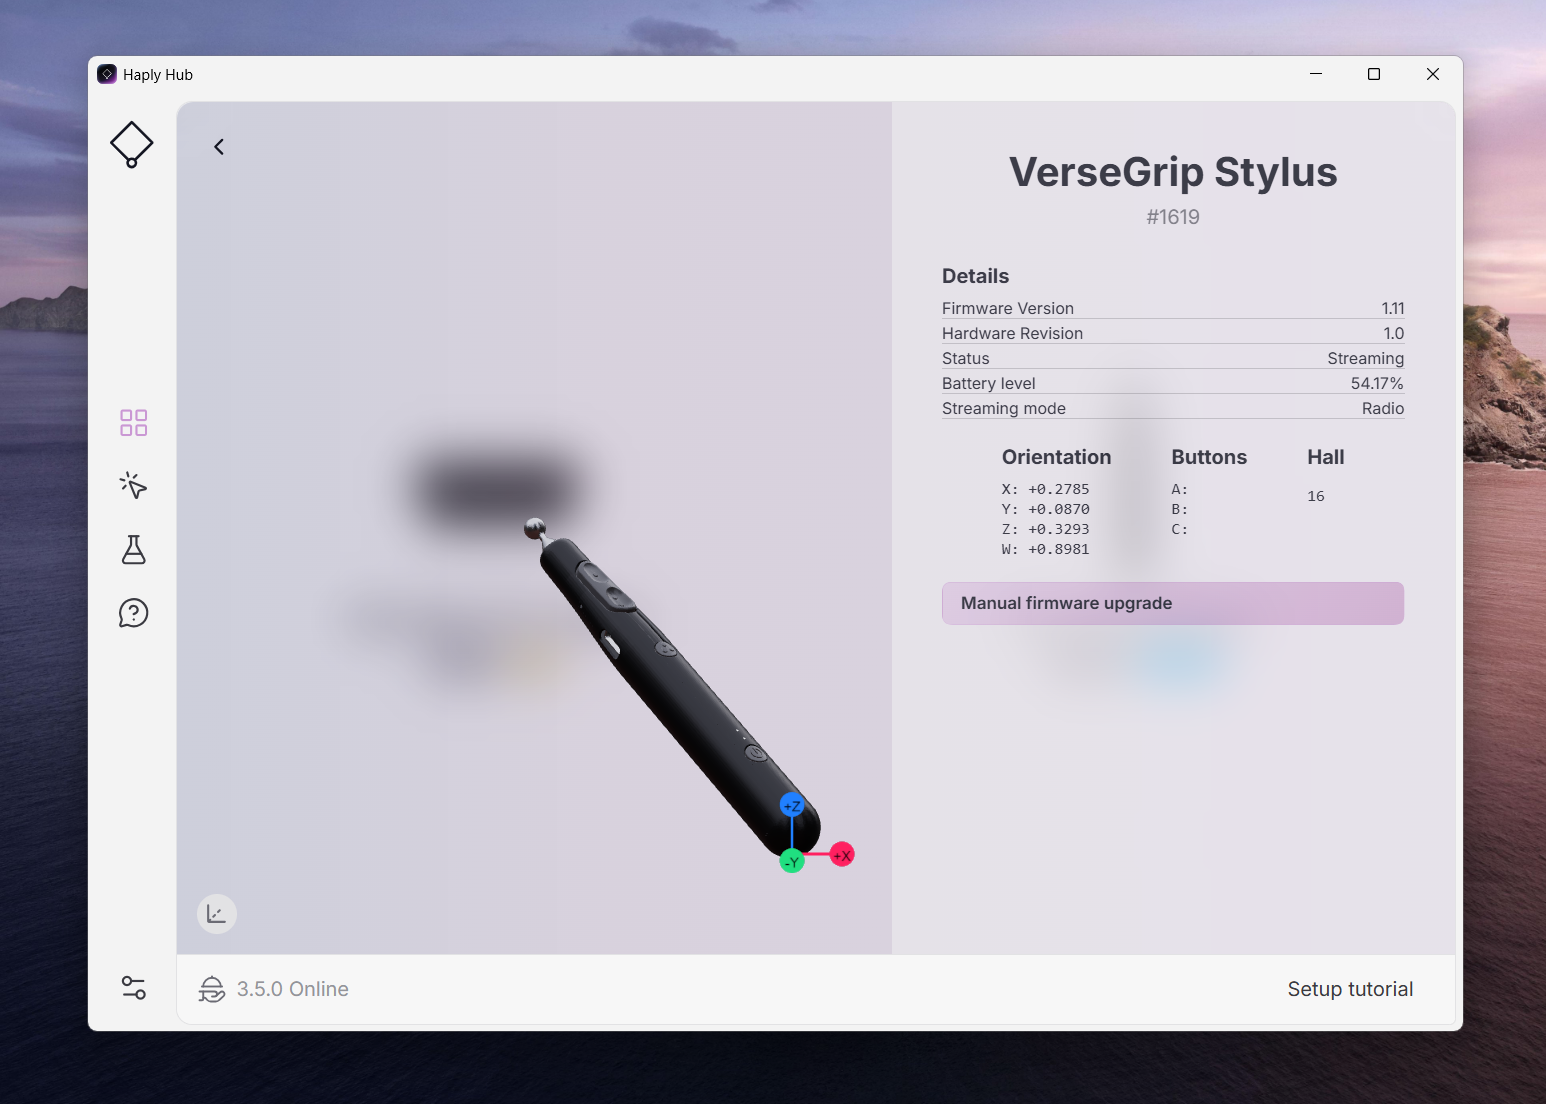
In the Setting tab of the Haply Hub, you can verify which version of the Hub is installed and which version of the Service is running.
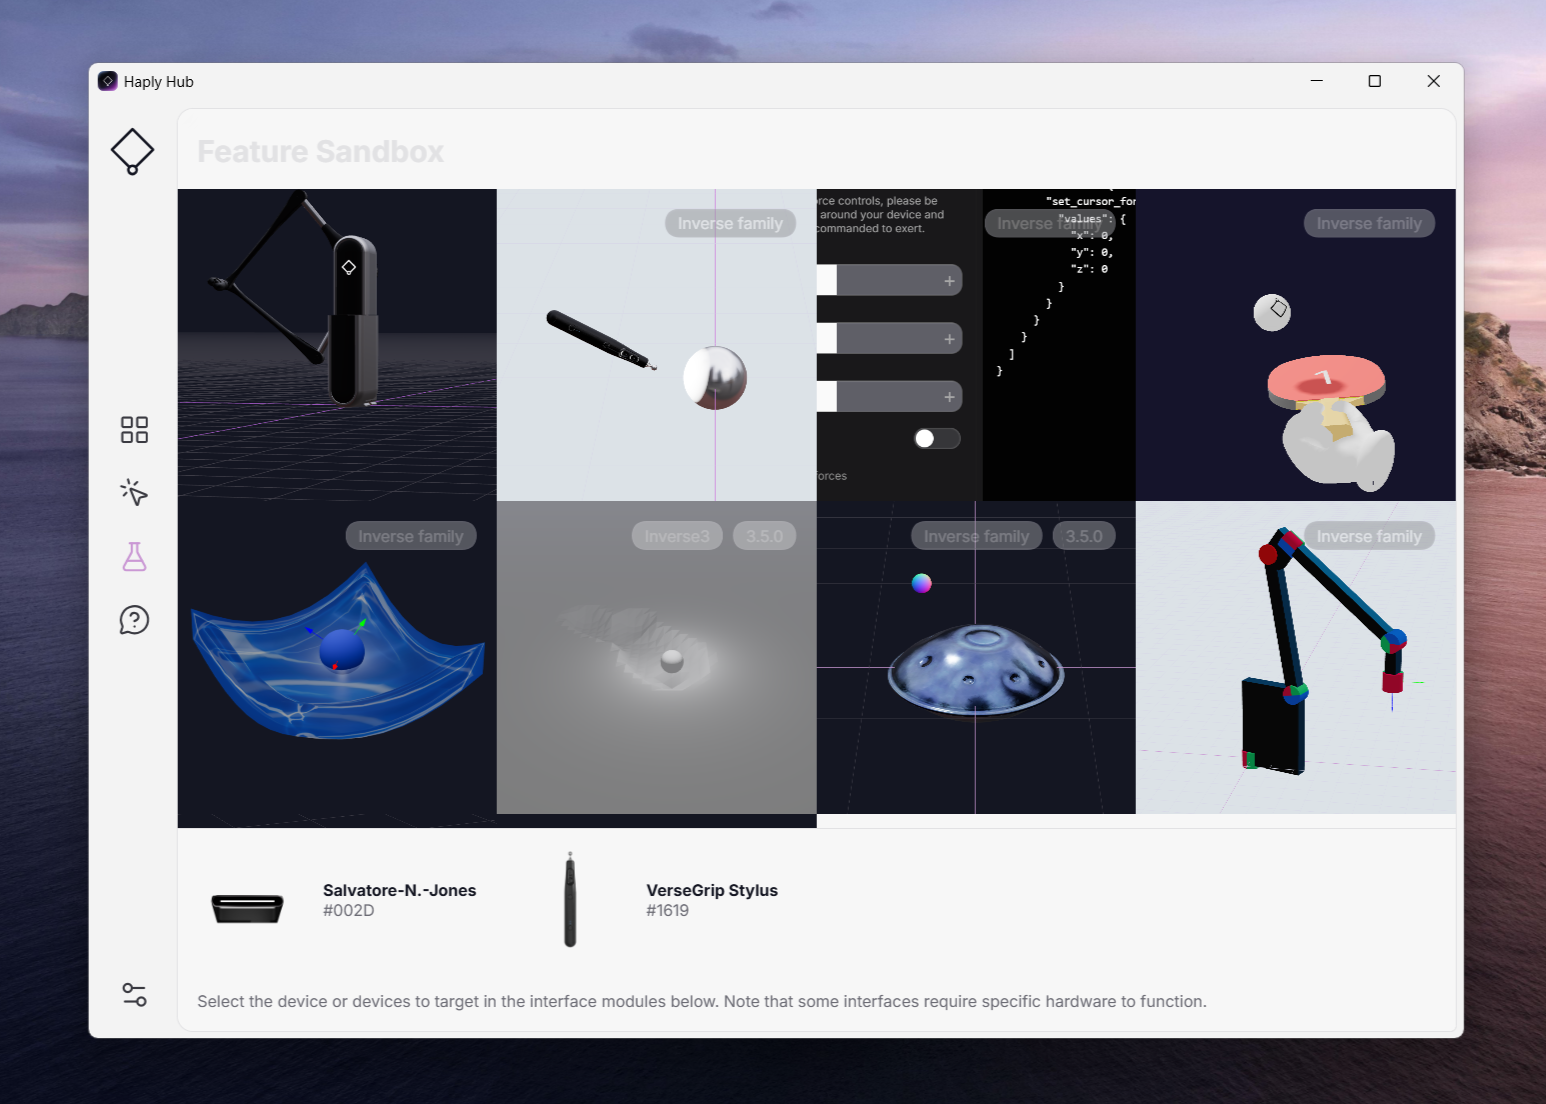
Feature Sandbox
Here you can experience different haptic simulations created by our team.
To access these features, your Minverse and VerseGrip Stylus must be connected and recognized by your computer.
Once your Minverse is connected, compatible simulations will be available in the Hub for you to try.
Setting up
Before you start:
- Make sure the latest version of the Haply Hub is installed and running.
- Minverse placement will vary depending on user preference. You can explore and find what feels the best for you.
- Ensure you have a stable and flat surface for the device to prevent it from falling or tipping.
- Clear the space around the device to avoid obstructing your hand movements.
- Position the device in such a way that you are comfortable working with it. You should not feel any strain on your wrist, forearm or elbow when using it.
Unfolding the Minverse
- Unfold the stabilizing feet on the Minverse and place the device where it is most comfortable for you.
- Ensure the Minverse head is parallel to your desk with the status light facing and away from you and the arms are facing you.
- To unclip the arm, carefully lift the left elbow, gently grab and pull the tip of the arm or gimbal.
Attaching and detaching the VerseGrip Stylus
To attach the Stylus:
- With one hand, firmly hold the arm of the Minverse.
- Rotate the gimbal until the circular cutout is facing upwards and hold it securely to prevent movement.
- With your other hand, pick up the Stylus and carefully place the ball connector onto the circular cutout of the gimbal. You can use your index finger to hold the ball connector in place and prevent it from slipping out.
- Firmly rotate the Stylus downwards, in a lever-like motion, until the ball connector snaps into the circular cutout.
To detach the Stylus:
- Rotate it firmly in a lever-like motion until the ball connector snaps out of the circular cutout.
Connecting your device
- Attach the power cord to the power supply and connect it to the wall outlet.
- Connect the power supply and the USB-C cable to your Minverse.
- Connect the Stylus adapter to your computer. Ensure the adapter is connected in a clear line of sight of the VerseGrip Stylus.
- Verify your device has been successfully connected in the Haply Hub and checking the status light.
Your devices will now appear in the Device Overview of the Haply Hub. If this is not the case, go to the Troubleshooting section or contact Haply Support.
Calibrating
You must calibrate your device before you start using it to ensure the accuracy of the position, rotation and force output.
When the status light on your Minverse is yellow, calibration is required:
- Power on your Stylus and place it in the inkwell with the buttons facing the right.
- Push the Stylus into the Inkwell until you feel a click and hear the calibration sound, wait 2 seconds for the IMU in the Stylus to stabilize.
- Once the calibration is completed, the status lights on your device and handle will change to indicate calibration was succesful.
If you need to change the orientation of your VerseGrip Stylus, you can recalibrate it by:
- Holding it in the orientation you wish to recalibrate it to.
- Press and hold the calibration button until the status light goes from blinking yellow to solid.
Note that you will need to repeat the calibration process if your device is disconnected.
The Haply Hub will show the active state of your device and confirm the calibration process was successful.
Putting away your Minverse
Once you are done working with your Minverse, you can quickly pack it away for transport:
- Power off your VerseGrip Stylus by holding the power button until the status light turns off.
- Detach the Stylus from the arm by turning it in, in a lever-like motion, until the ball connector snaps out of the gimbal.
- Unplug the USB-C and power supply from your Minverse.
- Rotate the Minverse head towards you until the status light faces you at a 45° angle.
- Close the base's feet back in and put your Minverse and all the accessories in the travel case.
If you want to keep it on your desk, here are some useful tips:
- You can keep the Stylus and your MinVerse connected with no haptic applications running.
- Make sure you power off your Stylus once you are done using it. If you leave your Stylus powered, it will automatically go into standby mode when inactive to preserve battery but this it will continue to slowly deplete the battery.
- Remember, you may need to recalibrate if your Minverse is disconnected from your computer.
- You can store your device and accessories in the travel case to protect it whenever you're not using it.
Troubleshooting & Support
Here are some tips and tricks for correcting common problems you may encounter with the Minverse or VerseGrip Stylus.
1. The Minverse status light is not turning on.
- Check the USB-C cable is plugged correctly into your computer and the Minverse USB-C port.
- Verify the USB port on your computer is working appropriately or try using a different USB port.
2. The Minverse status light is not changing from blinking to solid when connected to power.
- Make sure the power cord is properly plugged into the power supply a working wall outlet.
- Check the connection between the power supply and Minverse port is made correctly.
- Try connecting the power cord into a different wall outlet.
3. The Minverse status light is red even though the Haply Service shows online in the Haply Hub
- The Haply Hub might not be properly registering the Service running, quit and restart the Haply Hub in the task manager.
- In the Haply Hub Settings section, toggle the Service settings button and disable and re-enable the Service.
4. The Stylus is on but blinking red, and is not showing up on the Haply Hub.
- Make sure the Stylus adapter is properly connected to your computer.
- Try connecting the Stylus adapter into a different USB port.
- Confirm the USB port on your computer is functional through the native OS settings or restart your computer. You may try connecting a different USB device to confirm the port is active, and retry connecting your Stylus.
5. The device and accessories are on but do not show in the Haply Hub.
- Make sure you have the latest version of the Haply Hub.
- Restart the Haply Hub by right clicking its logo on your computer's taskbar, press quit and re-open the Haply Hub.
6. The VerseGrip Stylus and the cursor in the application seem out of sync or in different orientation.
- Your Stylus might not be properly calibrated, try recalibrating using the inkwell or the calibration button on the Stylus.
If you are still unable to solve your issue with the suggestions above, please contact support at https://haply.odoo.com/support-request or through the Haply Hub
Other information
For detailed User Manual and other useful resources, please visit the MinVerse Quick Start page.
For up to date Warranty and other legal information, please visit haply.co/legal.