Physics-Based Force-Feedback [Experimental]
Previous examples rendered primitive objects like a plane or a sphere where the force-feedback calculations were coded by hand due to their simplicity. As the objects become more complex, manual calculations become cumbersome and complicated. Physics engines like SOFA, IMSTK, and CHAI3D are heavily optimized for haptic applications allowing them to execute at frequencies above 1000 Hz creating realistic haptic simulations but they require integration into Unity. Unity has a built in physics engine which can be used for simple simulations. This article shows how to build a haptic scene and incorporate the physics engine into a haptic simulation using kinematic and non-kinematic objects.
Introduction
Unity has two types of RigidBodies kinematic and non-kinematic. Kinematic objects are controlled by scripts like the Cursor in previous examples. In contrast, non-kinematic bodies are controlled by collisions and the resulting forces. The challenge lies in exchanging force data between the user and the non-kinematic object, as neither the force input nor the force output can be measured directly.
To get around this issue, we employ ConfigurableJoints to create a virtual coupling which joins a kinematic and a non-kinematic object with a virtual linkage composed of a spring and a damper. Effectively, when a non-kinematic object collides with another non-kinematic object, it will be impeded from moving but the kinematic object will continue moving, stretching the spring and creating a force. We can use the resulting force directly to render the objects.
Scene setup
The implementation for this relies on using two objects in tandem:
- The Cursor object (kinematic), which will match your device's cursor position
- The PhysicEffector (non-kinematic), which will be linked to the Cursor object via a fixed joint.
The force rendered by your device will be relative to the distance between these two objects, such that when the PhysicsEffector object is blocked by another object in the scene, an opposing force proportional to the distance from the Cursor object will be generated.
- Add a Haptic Thread and Cursor as was shown in Getting started Guide.
- Create a Workspace as shown in Workspace Scaling and Placement.
- Create a Sphere called Physics Effector under Haptic Workspace with the same transform values as Cursor.
- Add various 3D objects with colliders in the scene.
- Add a Cube with a rigid body, its gravity enabled and a mass of
1000.
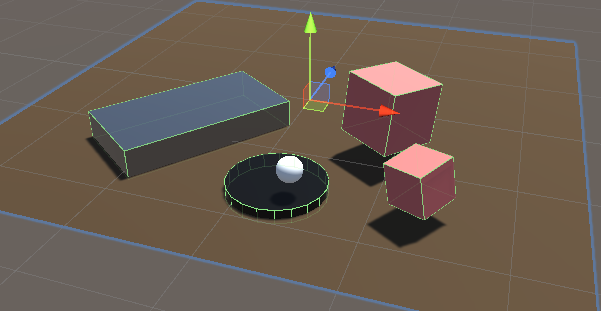
optional: You can set the built-in
SpatialMappingWideframematerial on PhysicEffector to see how the sphere rotates as you move it across the surface because of the friction.
Simple physics haptic loop
Add a new C# Script called SimplePhysicsHapticEffector.cs to the
PhysicEffector game object. The source for this script is given below.
using Haply.HardwareAPI.Unity;
using UnityEngine;

public class SimplePhysicsHapticEffector : MonoBehaviour
{
    // Thread safe scene data
    private struct AdditionalData
    {
        public Vector3 physicEffectorPosition;
    }

    public bool forceEnabled;
    [Range(0, 800)]
    public float stiffness = 400f;
    [Range(0, 3)]
    public float damping = 1;

    private HapticThread m_hapticThread;

    private void Awake ()
    {
        // Find the HapticThread object before the first FixedUpdate() call.
        m_hapticThread = FindObjectOfType<HapticThread>();

        // Create the physics link between the physic effector and the device cursor
        AttachCursor( m_hapticThread.avatar.gameObject );
    }

    private void OnEnable ()
    {
        // Run haptic loop with AdditionalData method to get initial values
        if (m_hapticThread.isInitialized)
            m_hapticThread.Run(ForceCalculation, GetAdditionalData());
        else
            m_hapticThread.onInitialized.AddListener(() => m_hapticThread.Run(ForceCalculation, GetAdditionalData()) );
    }

    private void FixedUpdate () =>
        // Update AdditionalData
        m_hapticThread.SetAdditionalData( GetAdditionalData() );

    // Attach the current physics effector to the device end-effector with a fixed joint
    private void AttachCursor (GameObject cursor)
    {
        // Add a kinematic rigidbody to the cursor.
        var rbCursor = cursor.GetComponent<Rigidbody>();
        if ( !rbCursor )
        {
            rbCursor = cursor.AddComponent<Rigidbody>();
            rbCursor.useGravity = false;
            rbCursor.isKinematic = true;
        }

        // Add a non-kinematic rigidbody to self
        if ( !gameObject.GetComponent<Rigidbody>() )
        {
            var rb = gameObject.AddComponent<Rigidbody>();
            rb.useGravity = false;
        }

        // Connect self to the cursor rigidbody
        if ( !gameObject.GetComponent<FixedJoint>() )
        {
            var joint = gameObject.AddComponent<FixedJoint>();
            joint.connectedBody = rbCursor;
        }
    }

    // Method used by HapticThread.Run(ForceCalculation) and HapticThread.GetAdditionalData()
    // to synchronize the physic effector position information between the physics thread and the haptic thread.
    private AdditionalData GetAdditionalData ()
    {
        AdditionalData additionalData;
        additionalData.physicEffectorPosition = transform.localPosition;
        return additionalData;
    }

    // Calculate the force to apply based on the distance between the two effectors.
    private Vector3 ForceCalculation ( in Vector3 position, in Vector3 velocity, in AdditionalData additionalData )
    {
        if ( !forceEnabled )
        {
            return Vector3.zero;
        }
        var force = additionalData.physicEffectorPosition - position;
        force *= stiffness;
        force -= velocity * damping;
        return force;
    }
}
With this setup you should be able top feel each object in scene, with heavier objects offering more resistance.
Problems:
- The feeling of friction/drag is caused by the difference in update frequency between Unity's physics engine (between 60Hz to 120Hz) and the haptics thread (~1000Hz). This difference means that the physics effector will always be lagging behind the Cursor's true position which leads to forces that resemble a step function instead of being continuous.
- No real haptics on moving objects.
Solutions:
- Decrease the value of
ProjectSettings.FixedTimestepas close to0.001as possible. This change will have significant impact on performances for complex scenes. - Apply forces only when collisions occur (see the next example)
- Use a third-party physics/haptic engine like (TOIA, SOFA, etc...) as a middleware between unity's physics engine and the haptic loop to simulate the contact points at a higher frequency.
More advanced physics haptic loop
In this example we will:
-
Use the collision detection output to avoid the feeling of friction/drag when the effector isn't in contact with an object.
-
A ConfigurableJoint with a limit, spring and damper as link between the two effectors instead of a FixedJoint. This will allow us to use Unity's PhysicsMaterials to set different friction values on the objects in the scene and feel the mass of an movable object through the force feedback.
On the Physic Effector game object, replace the
SimplifiedPhysicsHapticsEffector script component by a new C# Script
called AdvancedPhysicsHapticEffector.cs
using Haply.HardwareAPI.Unity;
using System.Collections.Generic;
using UnityEngine;

public class AdvancedPhysicsHapticEffector : MonoBehaviour
{
    /// Thread-safe scene data
    private struct AdditionalData
    {
        public Vector3 physicEffectorPosition;
        public bool isTouching;
    }

    public bool forceEnabled;

    [Range(0, 800)]
    public float stiffness = 400f;
    [Range(0, 3)]
    public float damping = 1;

    private HapticThread m_hapticThread;

    // Apply forces only when we're colliding with an object which prevents feeling
    // friction/drag while moving through the air.
    public bool collisionDetection = true;

    private List<Collider> m_Touched = new();

    private void Awake ()
    {
        // Find the HapticThread object before the first FixedUpdate() call.
        m_hapticThread = FindObjectOfType<HapticThread>();

        // Create the physics link between the physic effector and the device cursor
        AttachCursor( m_hapticThread.avatar.gameObject );
    }

    private void OnEnable ()
    {
        // Run haptic loop with AdditionalData method to get initial values
        if (m_hapticThread.isInitialized)
            m_hapticThread.Run(ForceCalculation, GetAdditionalData());
        else
            m_hapticThread.onInitialized.AddListener(() => m_hapticThread.Run(ForceCalculation, GetAdditionalData()) );
    }

    private void FixedUpdate () =>
        // Update AdditionalData with the latest physics data.
        m_hapticThread.SetAdditionalData( GetAdditionalData() );

    /// Attach the current physics effector to the device end-effector with a joint
    private void AttachCursor (GameObject cursor)
    {
        // Add a kinematic rigidbody to the cursor.
        var rbCursor = cursor.AddComponent<Rigidbody>();
        rbCursor.useGravity = false;
        rbCursor.isKinematic = true;

        // Add a non-kinematic rigidbody to self.
        var rb = gameObject.AddComponent<Rigidbody>();
        rb.useGravity = false;
        rb.drag = 80f; // stabilize spring connection

        // Connect self with the cursor rigidbody via a spring/damper joint and a locked rotation.
        var joint = gameObject.AddComponent<ConfigurableJoint>();
        joint.connectedBody = rbCursor;
        joint.anchor = joint.connectedAnchor = Vector3.zero;
        joint.axis = joint.secondaryAxis = Vector3.zero;

        // Limit linear movements.
        joint.xMotion = joint.yMotion = joint.zMotion = ConfigurableJointMotion.Limited;

        // Configure the limit, spring and damper
        joint.linearLimit = new SoftJointLimit()
        {
            limit = 0.001f
        };
        joint.linearLimitSpring = new SoftJointLimitSpring()
        {
            spring = 500000f,
            damper = 10000f
        };

        // Lock the rotation to prevent the sphere from rolling due to friction with the material which will
        // improve the force-feedback feeling.
        joint.angularXMotion = joint.angularYMotion = joint.angularZMotion = ConfigurableJointMotion.Locked;


        // Set the first collider which handles collisions with other game objects.
        var sphereCollider = gameObject.GetComponents<SphereCollider>();
        sphereCollider.material = new PhysicMaterial {
                dynamicFriction = 0,
                staticFriction = 0
        };


        // Set the second collider as a trigger that is a bit larger than our first collider. It will be used to
        // detect when our effector is moving away from an object it was touching.
        var trigger = gameObject.AddComponent<SphereCollider>();
        trigger.isTrigger = true;
        trigger.radius = sphereCollider.radius * 1.08f;
    }

    // Method used by HapticThread.Run(ForceCalculation) and HapticThread.GetAdditionalData()
    // to synchronize the physic effector position information between the physics thread and the haptic thread
    private AdditionalData GetAdditionalData ()
    {
        AdditionalData additionalData;
        additionalData.physicEffectorPosition = transform.localPosition;
        additionalData.isTouching = collisionDetection && m_Touched.Count > 0;
        return additionalData;
    }

    // Calculate the force to apply based on the distance between the two effectors
    private Vector3 ForceCalculation ( in Vector3 position, in AdditionalData additionalData )
    {
        if ( !forceEnabled || (collisionDetection && !additionalData.isTouching) )
        {
            // Don't compute forces if there are no collisions which prevents feeling drag/friction while moving through air.
            return Vector3.zero;
        }
        var force = additionalData.physicEffectorPosition - position;
        force *= stiffness;
        return force;
    }

    private void OnCollisionEnter ( Collision collision )
    {
        if ( forceEnabled && collisionDetection && !m_Touched.Contains( collision.collider ) )
        {
            // Store the object that our effector is touching.
            m_Touched.Add( collision.collider );
        }
    }

    private void OnTriggerExit ( Collider other )
    {
        if ( forceEnabled && collisionDetection && m_Touched.Contains( other ) )
        {
            // Remove the object when our effector moves away from it.
            m_Touched.Remove( other );
        }
    }

}
Source files
The final scene and all associated files used by this example can be imported from Unity's package manager.
Additional features:
- Choose between simplified or advanced physics effector by pressing the
1or2key. - Control the Haptics framerate with the
LEFT/RIGHTkeys. - Control the Physics framerate with the
UP/DOWNkeys. - Toggle Collision Detection with the
Ckey. - Toggle Force feedback with the
SPACEkey. - A prepared scene with static ans dynamic objects that have different mass and PhysicsMaterials.
- A UI to display the properties of touched objects (static/dynamic friction, mass, drag...)