Quick Start: Haptic Advanced Robotics Platform (H.A.R.P)
This article provides instructions on basic operations and the connection process for the different devices that can be used with H.A.R.P. By the end, you will know the basic operation of H.A.R.P. and the order of operations to correctly use the software package.
Overview
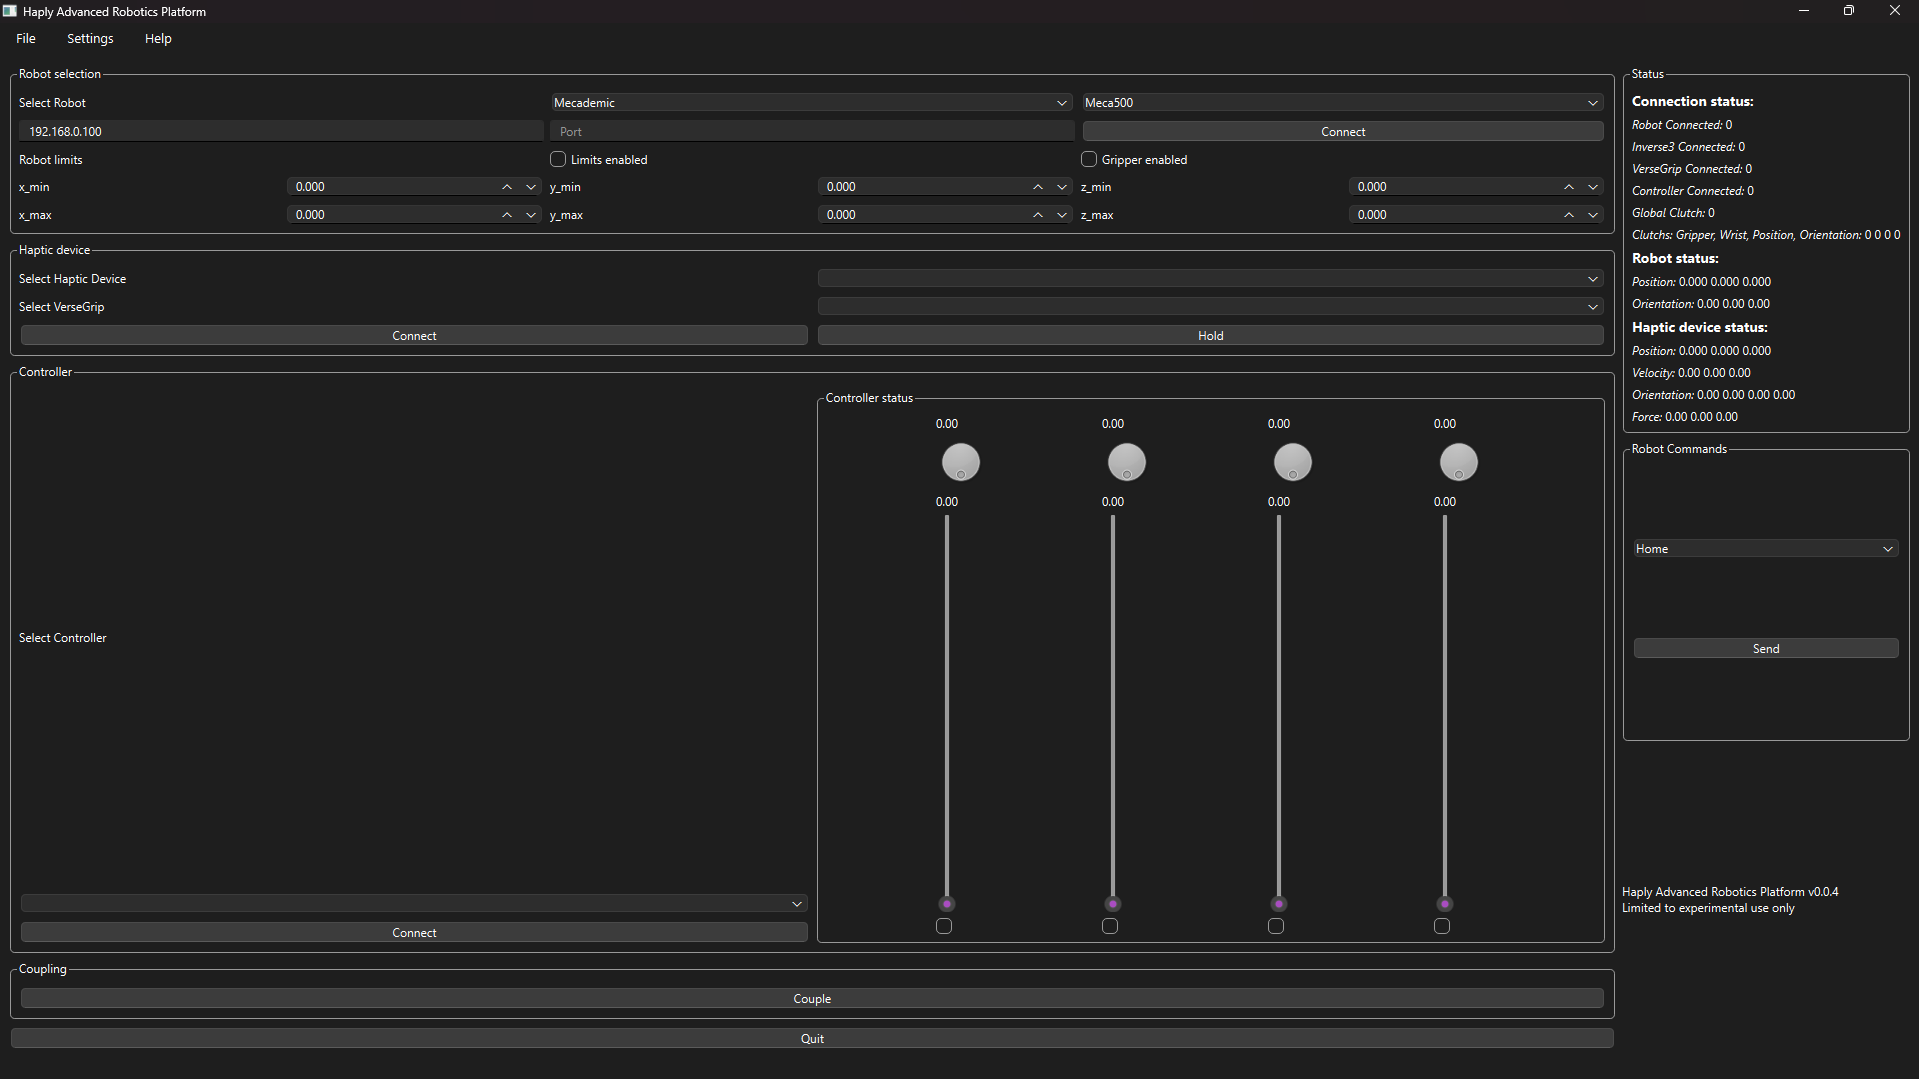
There are 10 sections to the H.A.R.P program.
- The File menu
- The Settings menu
- The Help menu
- The Quit Button
- The Robot selection box
- The Haptic device box
- The Controller box
- The Coupling box
- The Status box
- The Robot Commands box
The Help menu and Quit button are self-explanatory so they will not be explained in detail
Please ensure that all hardware is powered and connected to the control computer before starting the H.A.R.P program.
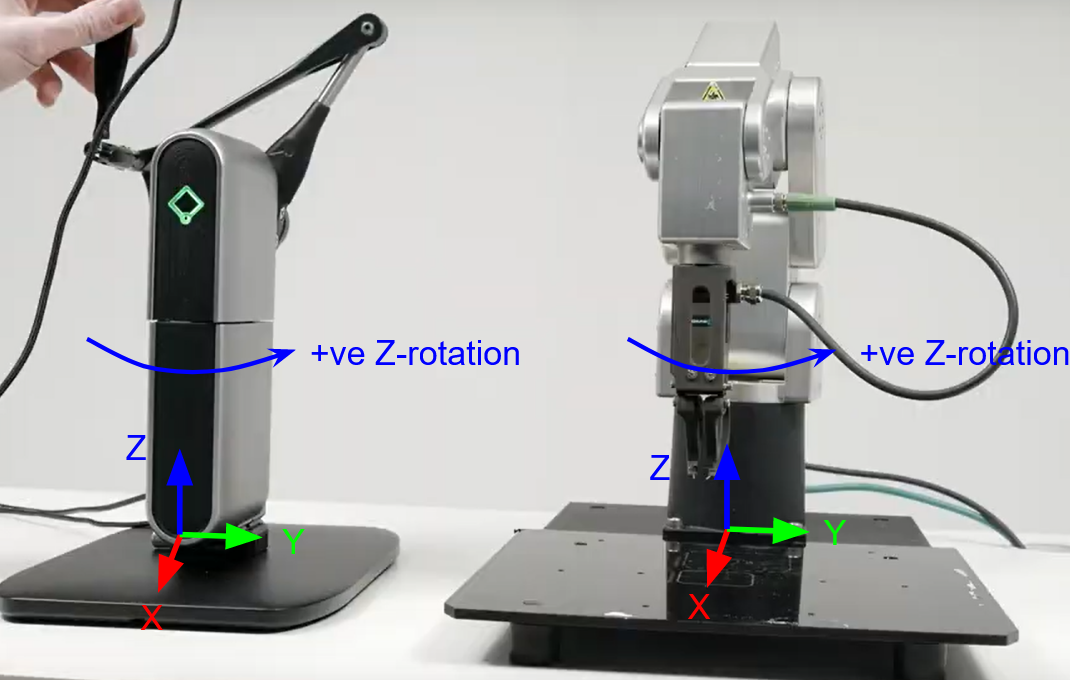
Hardware Setup
By default H.A.R.P is set to use the inverse and robot in the following orientations, note that a right-handed inverse is shown, also the relative positions do not matter.
Activating your License
The first step when you open H.A.R.P for the first time is to enter the provided license key, without a license only the Inverse 3 will work everything else will not function.

Select License from the File menu

Enter the provided license key and press Activate.
This process only needs to be completed once per user account/computer
Connecting a Robot
The first step in using H.A.R.P is to connect the robot you want to control, currently, only the Mecademic Meca500 is officially supported.

Selecting Robot and Inputting Connection Information
Start by selecting the company of the robot you wish to control then select which model of robot.
Next input the IP and port used to connect to the robot, please reference the manual provided by the manufacturer for more information on the correct process.
Setting Limits
If you wish to have software limits on the robot you are operating, check the limits enabled box and enter the limits you wish to use in the boxes provided
Gripper Operation
If you have a gripper connected make sure to check the gripper enabled box, if you have a gripper connected but you do not check the box the program will malfunction the inverse is also true.
After you have completed the above steps, click the connect button to connect the robot to H.A.R.P, its status should now be reflected in the status box.
Connecting a Haply Inverse and VerseGrip

If you set up the Haply Inverse 3 and VerseGrip correctly and connected them to the control computer before starting H.A.R.P, they should appear in the corresponding drop-down menus. Simply select the correct devices and click the connect button, the device status should now be reflected in the status box.
The Hold Button
The Hold button can be used to tell the Inverse 3 to stay in place using its force control functionality, this can be activated at any time, although we don't recommend using it for longer than a few minutes, as is explained in our safe operation section.
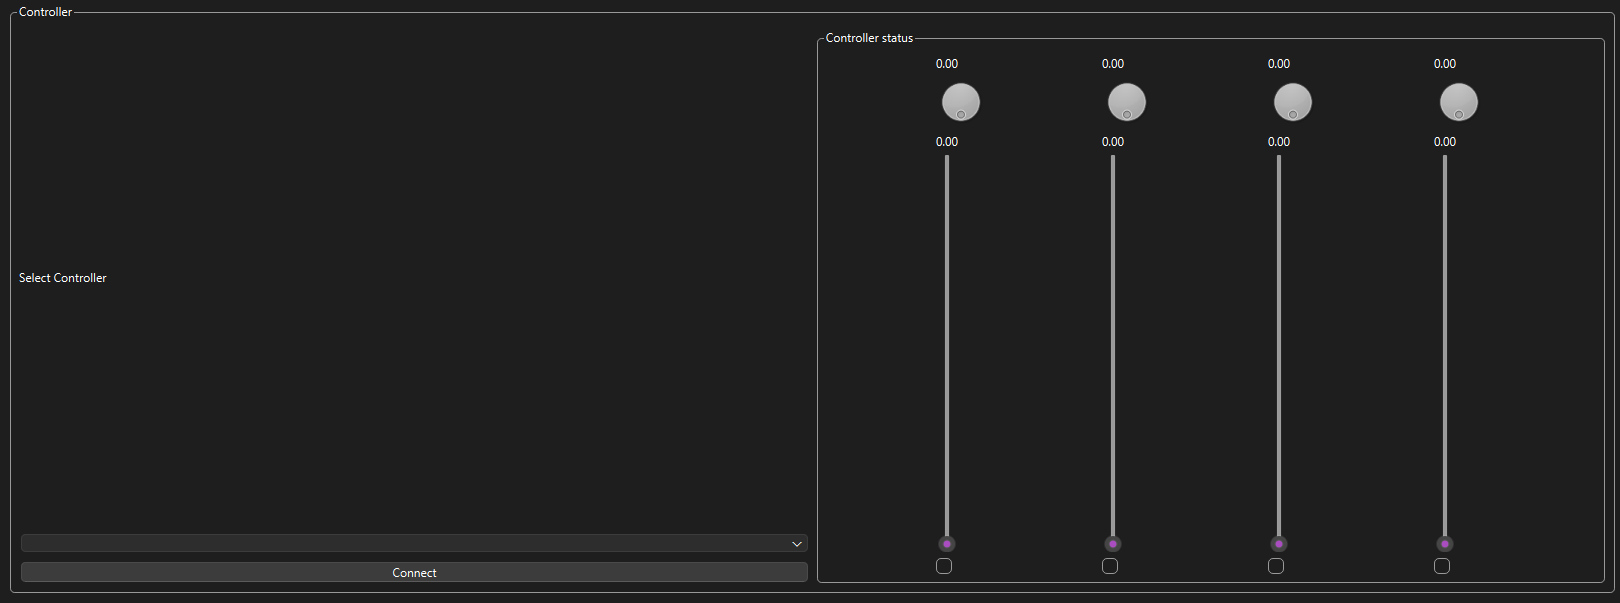
Connecting an Extra Controller
To provide additional functionality to H.A.R.P. an extra controller can be connected, either a hardware controller like the Midi Sidekick or simply using the built-in GUI controller.
Sidekick
As long as the sidekick was connected to the control computer before starting H.A.R.P it should appear in the drop-down menu. Simply select it and press connect. Make sure to move all the knobs and sliders to change their values from 0, the controller will not update after startup until they are moved.
Note, that you will not be able to control the inputs from the GUI if you have selected/connected the sidekick controller
Gui Controller
If you wish to just use the built-in Gui controller, simply select it from the drop-down and press connect, after that you should be able to drag/click the different Gui elements to change the values.
Coupling everything
Once you have connected the Robot, Inverse 3, and Extra Controller (optionally a VerseGrip), you can press the coupling button to connect them all, the inverse will immediately be in control of the robot, so be sure to hold the inverse's handle before pressing this button.
Note, make sure to decouple everything before using the robot commands menu, otherwise the inverse will also move.
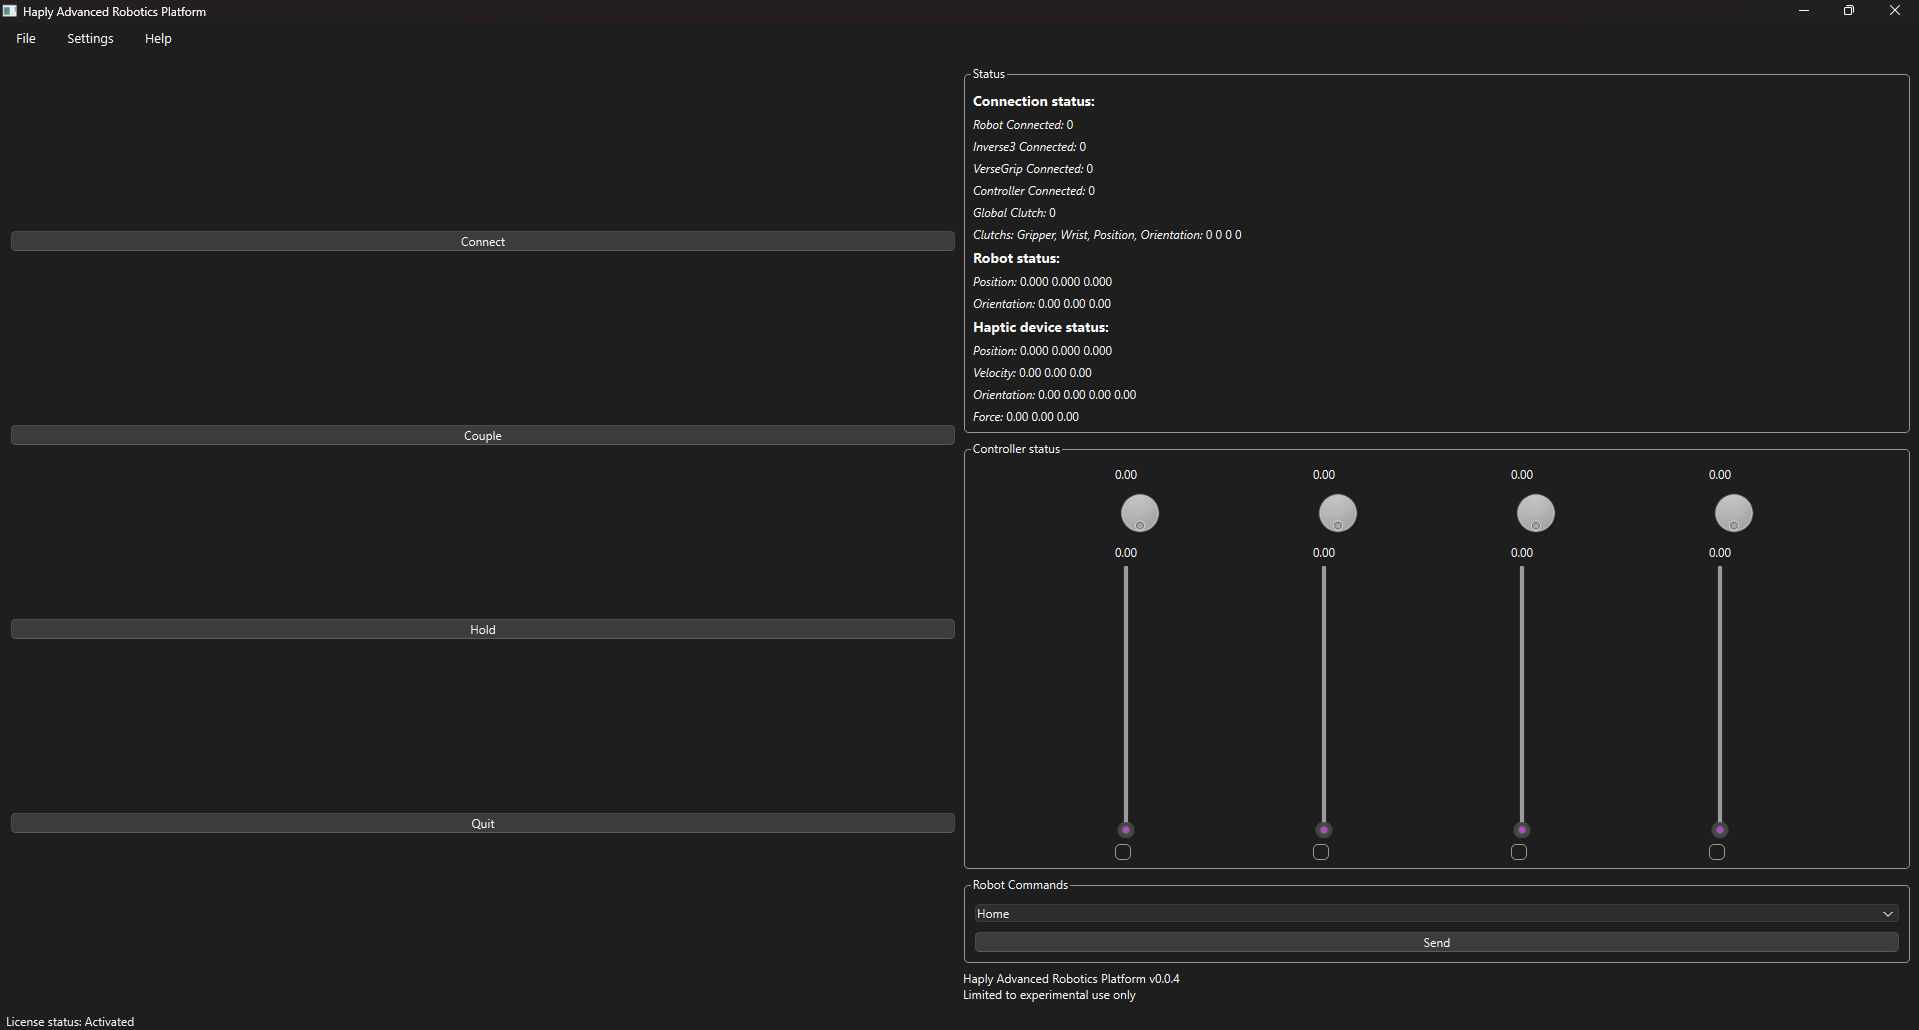
Status Menu
The Status menu is where most of the device information is displayed, as well as the clutch states.

At the top the connection status of all four possible hardware devices is shown, this will inform you if you've connected everything correctly, 1 is connected and 0 is disconnected
Below that the global clutch state is shown, 0 means that you are in control of the robot, and 1 means control is paused for that part of the control stack.
Next, the robot position and end effector orientation (using Euler angles) are shown.
Finally, the inverse position and velocity are shown, as well as the versegrips orientation (in wxyz quaternions), after which the current render force being sent to the inverse is shown.
Robot Commands

The final control section is robot commands, this provides the user the option to send predefined commands to the connected robot, currently only the 'Home' and 'Ship' commands are provided. This allows the user to bring the robot back to the home position if they get to an awkward position, and the ship position for storage and shipping of the robot.
Recording
The recording menu allows the user to record the robot commands sent by the inverse and replay them, both forward and reverse at the end, they can also both increase and decrease the playback speed.
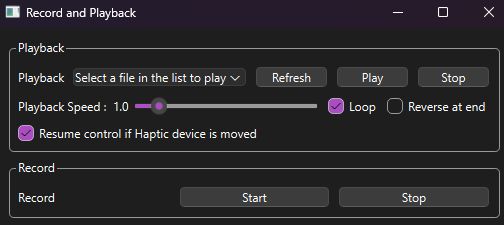
When trying to record robot commands use the lower recording menu, press start to begin the recording process and stop once you have completed the actions you'd like to record. Please make sure to clutch the robot once you have stopped recording.
Once the recording is finished, select whether you want to loop the playback, and/or reverse the cmds at the end. You can then press the Refresh button so the program will search for available recordings, select the recording you'd like to replay and press play, if you have selected loop then press the stop button when you want the replay to end. The user can also select resume control on haptic device movement, and that will stop the playback and resume haptic control if the inverse is moved. Otherwise, once you've pressed the stop button you will have to unclutch the robot before regaining control.
Additionally you can increase or decrease the playback speed using the provided slider.
User Preferences
Using the user preferences menu the user can save all their preferred settings allowing for a significantly faster start-up process.
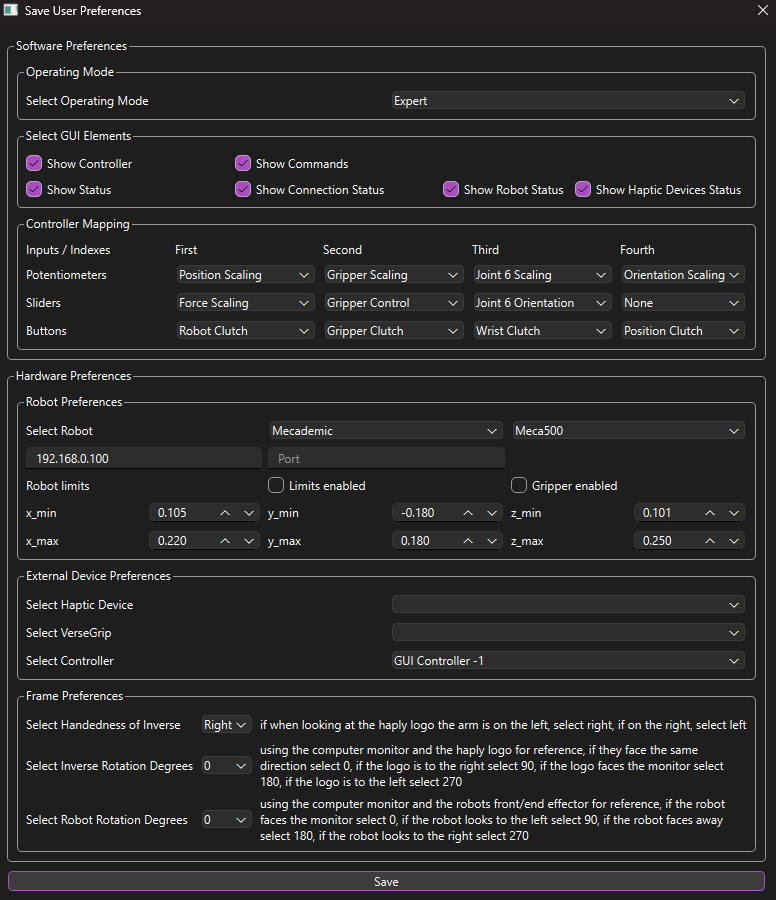
Software Preferences
The first option is the operating mode the user would like for the main H.A.R.P control menu, the options are expert (the default), advanced and simple. The advanced and simple operating modes are explained further below.
Next, the user can decide to show or hide certain GUI elements, by checking or unchecking the different boxes
After that, the user can customize what each potentiometer, slider, and button does on both the GUI controller and side kick controller. The potentiometer and slider options are completely interchangeable, allowing the user to customize scaling and control to their liking.
Hardware Preferences
First, the user can adjust and save which robot they would like to connect to, as well as save the limits they want to use. This matches the menu available for the robot in the expert operating mode, values will be copied from that menu so they don't need to be entered again.
Next, the different external devices you would like to use can be saved, including the haptic device, VerseGrip, and whether you want to default to the GUI controller of the midi sidekick controller.
Finally, the user can input how they have their physical devices set up if it does not match the default H.A.R.P. uses, currently, only orientation changes around the vertical axis are supported. The most important option is to tell H.A.R.P. whether you are using a right-hand or left-hand inverse as this changes the control scheme. The frame convention used in H.A.R.P is explained further below.
Operating Modes
In addition to the default expert mode, once the preferences dialog is filled out and saved the user can switch to advanced or simple mode to allow for faster start-up and a less cluttered GUI.

Advanced mode removes a few robot options while still allowing the user to switch between devices and retain full control
Simple mode removes most of the options just leaving a connect button, hold button, couple button, and quit button. Also the status menu, the controller status, and the robot commands menu.
Frame Conventions
The frames used to connect the inverse to a robot are shown above, note that there is an intermediary frame based on the approximate orientation of the control computer screen. The options are changed in increments of 90 degrees, also only the vertical axis orientation is considered. when selecting the relative orientation use the right-hand rule to find the angle change from the robot or inverse to the computer screen.
Additionally when using the versegrip to control the orientation of the robot end-effector, calibrate the versegrip facing the robot end-effector to setup its frame reference, no rotation needs to be selected in the provided menu.