Teleoperation
Teleoperation is the operating mode in which the motion of the 3D leader device is translated into motion of the follower, including the robot arm and connected end effector.
Before you begin:
- Ensure the robot cell and surrounding workspace are clear of tools, parts, and other obstacles from previous operations.
- Verify that the emergency stop is accessible and that the appropriate speed and motion limits are configured.
- Confirm that the correct Control Group is connected. See Create a Control Group.
- Make sure you are on the Command screen. See Command Center.
VerseGrip
The VerseGrip includes three buttons, as shown in the image below. Their functions in HARP are described in the following sections.
For general setup and usage information, see Getting Started with the VerseGrip Stylus.
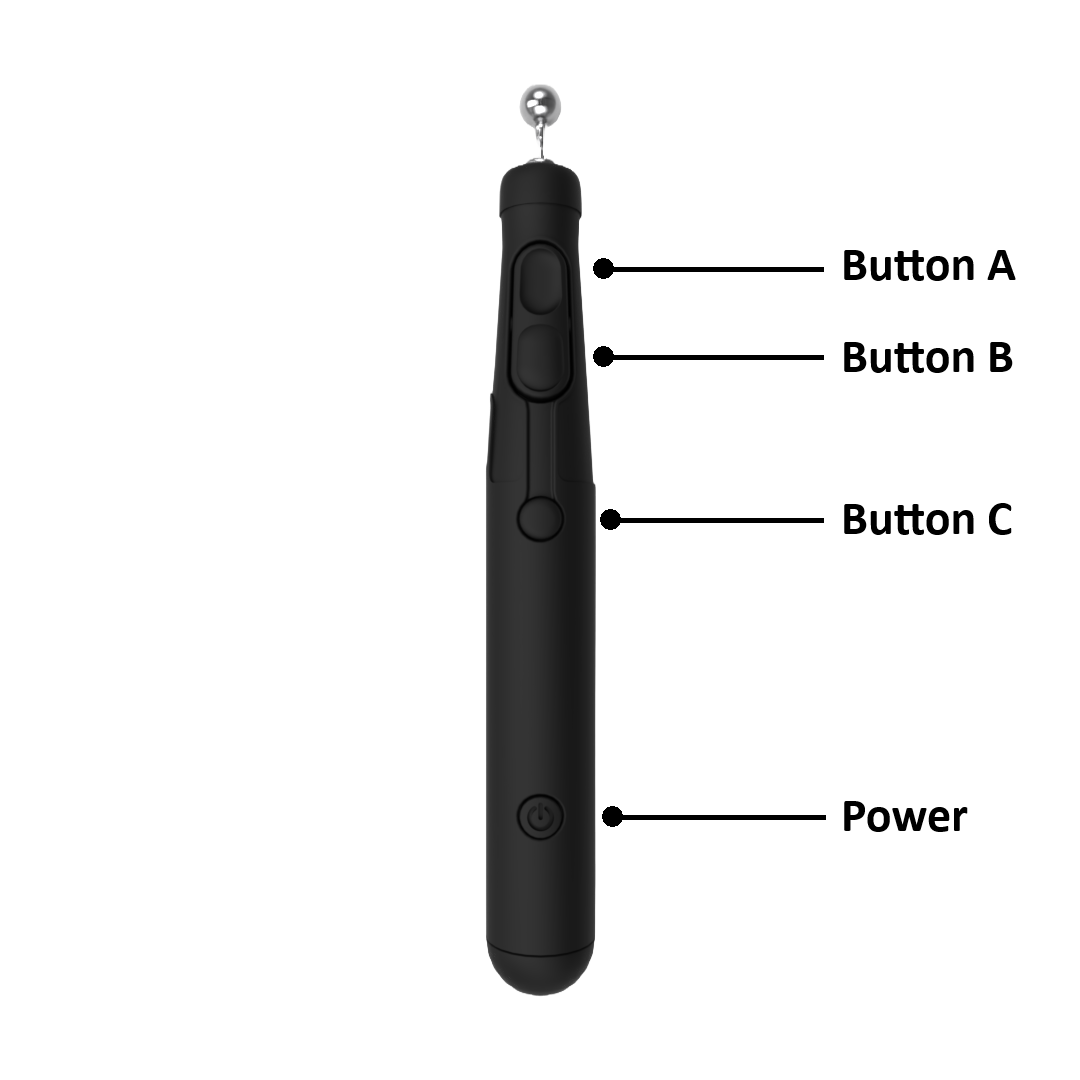
Button A - Basic Motion
- Clutch (hold): Press and hold to enable follower motion. Release the button to stop teleoperation and hold the robot at its current pose.
- When the clutch is engaged and orientation control is disabled, only Cartesian position is controlled. Changes in the VerseGrip orientation are ignored.
Button B - Orientation Control
- Orientation Toggle (press): Enables or disables orientation control during teleoperation.
- Off: Controls Cartesian translation only. The robot maintains its current orientation while following the leader's positional motion.
- On: While the clutch is engaged, the robot follows both the position and orientation of the VerseGrip.
Button C - End‑Effector Actuation
- Tool Action (press): Controls the connected end effector according to its configured plugin.
- Gripper: Opens or closes the gripper.
- Pump or other supported tool: Engages or disengages the tool based on the behavior defined by its plugin.
To control the Mecademic MPM500 Pneumatic Module:
- Use Button 3 (Calibration button) to open or close one pneumatic output.
- Use the O and P keys on the keyboard to open both outputs or close both outputs.
For more information, see MPM500 Module.
Roku
The Ruko includes four buttons and a control wheel for operating supported robots and grippers.
The clutch behavior differs from the VerseGrip. To enable robot motion, press and hold the clutch button located on the back of the Ruko.
The available controls include:
- Trigger: Clutch for teleoperation
- Left Button: Fully opens the connected gripper.
- Right Button: Fully closes the connected gripper.
- Down Button: Enables or disables orientation control.
- Wheel: For supported grippers such as Robotiq, the wheel can be used to gradually open or close the gripper.
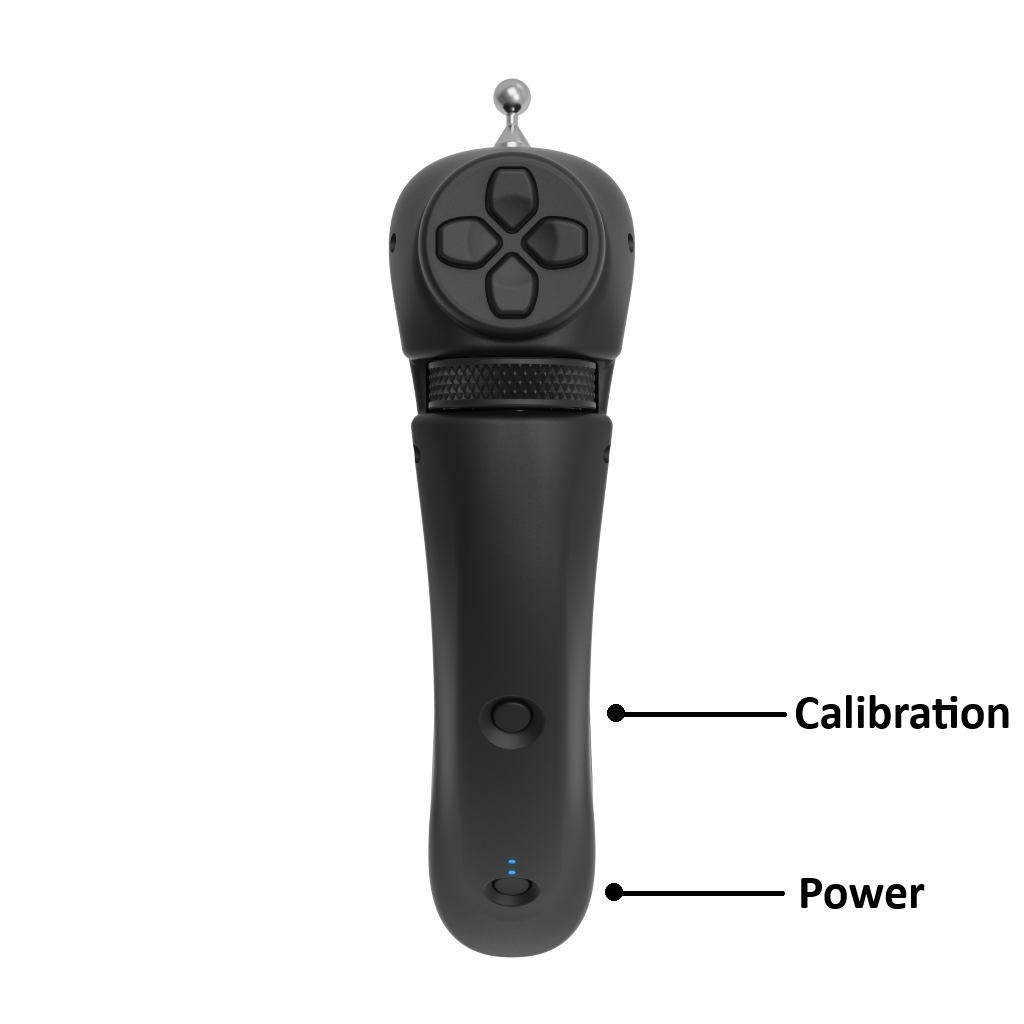
To control the Mecademic MPM500 Pneumatic Module, use the Left and Right buttons to open or close each pneumatic valve individually.
For more information, see MPM500 Module.
Mecademic MPM500 Pneumatic Module
The Mecademic MPM500 Pneumatic Module is supported in HARP v2.x. Because pneumatic control differs from standard gripper operation, the control behavior when using the VerseGrip or Ruko is also different.
For a visual demonstration of how to control the MPM500 through HARP, refer to the video below.
Re‑Centering the Leader
If the leader reaches its physical range limit during teleoperation:
- Release the clutch. The follower robot will hold its current pose.
- Reposition the leader to a more comfortable location within its workspace.
- Press and hold the clutch again to resume teleoperation from the new leader position.
Lock Axes
For some teleoperation tasks, locking one or more robot axes can simplify operation and improve motion control. HARP allows translational and rotational axes to be locked independently.
- Press X, Y, or Z to lock or unlock the corresponding translational axis.
- Press Shift + X, Shift + Y, or Shift + Z to lock or unlock the corresponding rotational axis.
For example, if the X and Y translational axes are locked, the robot can move only along the Z-axis. Motion along the X- and Y-axes is prevented.
The same principle applies to orientation control. Locking a rotational axis prevents rotation about that axis while allowing motion about the remaining unlocked axes.
When an axis lock is activated, colored indicators appear in the Command Bar to show which translational or rotational axes are currently locked.

Power Off Procedure
Close HARP
- Save your project before closing HARP using the save prompt.
- Click the X in the upper-right corner of the HARP window to close the application.
- The connected robot should disconnect automatically when HARP closes.
Shut Down the Inverse3
- If the Device Manager window is open, close it.
- Disconnect the USB-C cable from the Inverse3.
- Disconnect the power cable from the Inverse3.
Power Off the Wireless VerseGrip
- Press and hold the power button for approximately 3 seconds.
- Confirm that the LED indicators are off and no longer blinking.