Getting started with the Inverse Unity Package
This guide outlines the basic setup and provides a simple example to demonstrate the fundamental usage of the Haply Inverse Unity Package, including installing the package, setting up a Haptic Rig, and creating simple scripts for force and position control.
For comprehensive details and advanced techniques, explore the tutorials.
Version Support
- Unity 2021.3.x LTS: Supported
- Unity 2022.3.x LTS: Supported
- Unity 2023.x.x (Tech Stream): Experimental
- Haply Inverse SDK: 2.0.0 or greater
Prerequisites
- Install the Haply Inverse SDK version 2.0.0 or greater.
- Ensure the Haply Inverse Service is operational.
- Confirm that your Inverse3 and VerseGrip devices are connected and calibrated before launching the scene.
The package is under continuous development to enhance support for the Inverse3. For support, feedback, or requests, please contact us.
Installation
The Inverse Unity package is available through Unity’s Scoped Registry. To integrate the package:
-
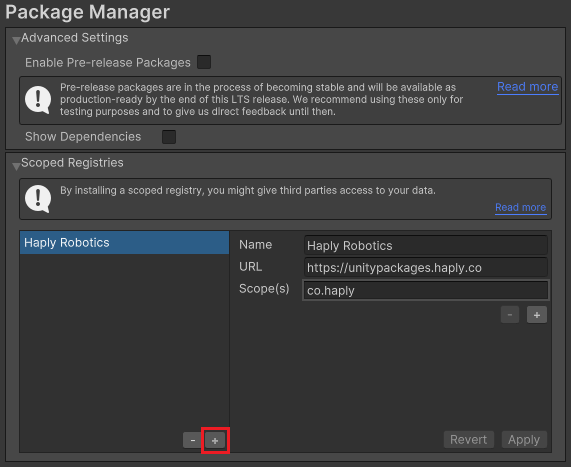
Open Edit > Project Settings > Package Manager. Add a new Scoped Registry with:
- Name:
Haply Robotics - URL:
https://unitypackages.haply.co - Scope(s):
co.haply
- Name:
-
Access Window > Package Manager, click the add + button, and select Add package by name. Enter
co.haply.inverseand click Add.
Upon successful installation, the package manager will display the Inverse package.
Setting Up the Haptic Rig
To create a Haptic Rig, navigate to GameObject > Haply Inverse > Haptic Rig (one hand). This action assembles a complete environment with the Inverse3 controller and the VerseGrip.
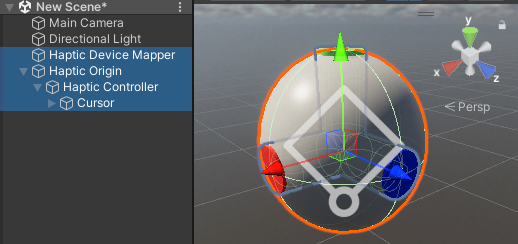
Your scene will now include:
- Haptic Device Mapper: Manages device allocation with the Haply Inverse Service.
- Haptic Origin: Scales and positions the haptic setup within the scene.
- Haptic Controller: Manages cursor force or position based on Inverse3 and VerseGrip device data.
- Cursor: Contains Inverse3Cursor and VerseGrip Cursor components for scene representation.
For more details on the package components, see the Global Architecture documentation page.
In Play Mode, the sphere will move and rotate in sync with the Inverse3 cursor and VerseGrip orientation.
Force Control Mode
Create a ForceControl.cs C# script and attach it to the Haptic Origin GameObject.
This script allows you to apply forces to the Inverse3 device using inspector sliders.
using Haply.Inverse.Unity;
using UnityEngine;

public class ForceControl : MonoBehaviour
{
    [Range(-2, 2)]
    public float forceX;
    [Range(-2, 2)]
    public float forceY;
    [Range(-2, 2)]
    public float forceZ;

    private Inverse3 _inverse3;

    private void Awake()
    {
        _inverse3 = GetComponentInChildren<Inverse3>();
    }

    protected void OnEnable()
    {
        _inverse3.DeviceStateChanged += OnDeviceStateChanged;
    }

    protected void OnDisable()
    {
        _inverse3.DeviceStateChanged -= OnDeviceStateChanged;
        _inverse3.Release();
    }

    private void OnDeviceStateChanged(Inverse3 inverse3)
    {
        inverse3.CursorSetForce(forceX, forceY, forceZ);
    }
}

Script Explanation
-
forceX, Y, Z: Adjustable force vector components using sliders, ensuring forces remain within safe limits before being passed to theCursorSetForcemethod. Alternatively, a standardVector3field could be used. -
Awake(): Retrieves the Inverse3 component from the current GameObject or its child. -
OnEnable(): Register theOnDeviceStateChangedcallback from the haptic update in a separate thread after theAwakemethod call and every time the script is enabled. -
OnDisable(): Unregister the callback and resets the force when the script is disabled or the application stops. -
OnDeviceStateChanged: Fetches theforcevector from the inspector window and relays it to the Inverse3 using theCursorSetForcemethod.IMPORTANT: The callback is triggered by the haptic thread at a high frequency, ranging from 4kHz to 8kHz. It's crucial to ensure that all code within this callback is highly optimized.
Usage
Before entering Play Mode, ensure you're holding the cursor. The device should transition to the Force Control state, indicated by a green light. You can then navigate the device workspace by adjusting the force output using the sliders.
Adjusting forces will cause the Inverse3 to move. Ensure your workspace is clear and always hold the cursor. For safety guidelines, refer to the Safe Use article.
Position Control Mode
Similarly, create a PositionControl.cs C# script for controlling the device's position and attach it to the Haptic Origin GameObject.
using Haply.Inverse.Unity;
using UnityEngine;

public class PositionControl : MonoBehaviour
{
   [Range(-0.1f, 0.1f)]
   public float positionX;
   [Range(-0.1f, 0.1f)]
   public float positionY;
   [Range(-0.1f, 0.1f)]
   public float positionZ;

   private Inverse3 _inverse3;

   private void Awake()
   {
     _inverse3 = GetComponentInChildren<Inverse3>();
   }

   protected void OnEnable()
   {
     _inverse3.DeviceStateChanged += OnDeviceStateChanged;
   }

   protected void OnDisable()
   {
     _inverse3.DeviceStateChanged -= OnDeviceStateChanged;
     _inverse3.Release();
   }

   private void OnDeviceStateChanged(Inverse3 inverse3)
   {
     var position = inverse3.WorkspaceCenterLocalPosition + new Vector3(positionX, positionY, positionZ);
     inverse3.CursorSetLocalPosition(position);
   }
}
Ensure the ForceControl script or any other scripts controlling the device are disabled.

Similar to the previous example:
- Utilize
positionX, Y, and Zto adjust the position using sliders during play mode.The selected
Range(-0.1, 0.1)roughly corresponds to the maximum achievable position. - The
Awakemethod retrieves the Inverse3 component. - The
OnEnablemethod register theOnDeviceStateChangedcallback from the haptic update in a separate thread after theAwakemethod call and every time the script is enabled. - The
OnDisablemethod unregister the callback and resets the force when the script is disabled or the application stops.
However, there are differences:
- The
OnDeviceStateChangedcallback, during each haptic frame, takes the position vector from the inspector window, adds it to theWorkspaceCenterLocalPosition, and sends it to the Inverse3 using theCursorSetLocalPositionmethod.
Before entering play mode, hold the cursor close to the center position. The device should transition to the position control state (indicated by a blue light). You can then explore the device workspace by adjusting the position output with the sliders.
When adjusting the position, the Inverse3 will move. Ensure the workspace is clear of any valuables and always hold the cursor. For additional details, refer to the Safe Use article.