Quick-Start: HardwareAPI Unity Package
This article provides basic setup instructions and a simple example demonstrating basic usage. For details and advanced usage, see the Unity Package reference or tutorials.
Version support
- Unity 2020.3.x LTS: Recommended
- Unity 2021.3.x LTS: Supported
- Unity 2022.x (Tech Stream): Experimental
Package Overview
The Haply HardwareAPI Unity Package is built on top of the Haply’s C# HardwareAPI class libraries and provides additional integrations and quality-of-life features tailor-made for Unity workflows.
The Haptic Thread and Handle Thread component handles communication with their respective device in a thread-safe, asynchronous communication loop. Additionally, Haptic Thread provides several methods for controlling the Inverse3. The package also automatically converts between Unity’s coordinate system and the Inverse3’s.
Note The package is under continuous development to further simplify development for the Inverse3. If you have any questions or requests, please contact us.
Install the Haply Hardware API package
The HardwareAPI Unity package is distributed via the Scoped registry feature of Unity’s package manager. This section covers the steps required to define a custom registry and add the HardwareAPI package to a new project.
-
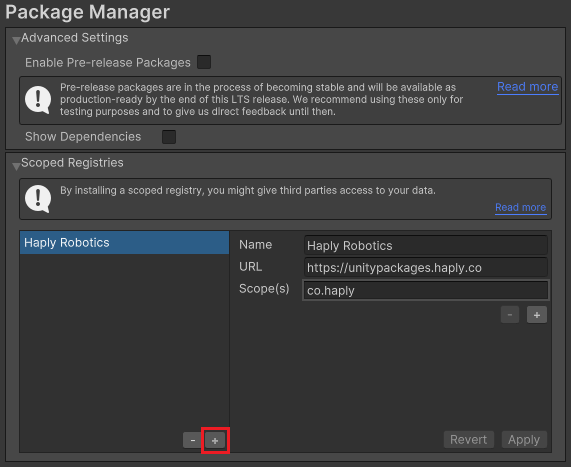
With a project open, navigate to Edit > Project Settings > Package Manager in the Unity toolbar and in the Package Manager window under the Scoped Registry section press a plus button and add the following:
- Name:
Haply Robotics - URL:
https://unitypackages.haply.co - Scope(s):
co.haply
As an alternative, you can also edit your project manifest file directly.
For more information on Unity Scoped Registry visit: docs.unity3d.com - Name:
-
Use Unity toolbar to navigate to Window > Package Manager
-
Click the add + button in the status bar and select Add package by name.

-
Enter
co.haply.hardwareapias the Name and click Add.
If successful, the package manager should display the following information.

Getting started
Controlling Inverse3
-
Create an empty Game Object under scene, name it Haptic Thread and from the inspector, add the Haptic Thread component on it.
-
In the Haptic Thread use the Device Address dropdown to select the Inverse3 device matching the name on its plate.

-
Add a sphere to the scene, name it Cursor and attach it to the EE Avatar in the HapticThread. If you enter Play Mode now, the sphere will move along with the cursor of the Inverse3, while position and velocity will be updated continuously in the inspector window.
-
Create a new C# script with the following code, then attach it to the same Game Object as the Haptic Thread:
using Haply.HardwareAPI.Unity;
using UnityEngine;

public class HapticController : MonoBehaviour
{
    [Range(-2, 2)]
    public float forceX;
    [Range(-2, 2)]
    public float forceY;
    [Range(-2, 2)]
    public float forceZ;

    private void Awake()
    {
        var hapticThread = GetComponent<HapticThread>();
        hapticThread.onInitialized.AddListener(() => hapticThread.Run(ForceCalculation));
    }

    private Vector3 ForceCalculation(in Vector3 position)
    {
        return new Vector3(forceX, forceY, forceZ);
    }
}- The
Awakemethod gets the Haptic Thread and starts the haptic calculations in a separate thread. It then adds a listener to theonInitializedevent, which, when invoked, will call the Run method and pass-inForceCalculationmethod as the delegate argument. ForceCalculationtakes the force vector provided in the inspector window and sends it to the Inverse3.
- The
-
Enter the play mode, the Haptic Thread will continuously update the device velocity and position in the inspector window. Explore the device workspace and try controlling the force output using the sliders.
WARNING: When changing forces, the Inverse3 will move so be sure to clear the workspace of valuables and to hold the cursor. For more information see the Safe Use article.
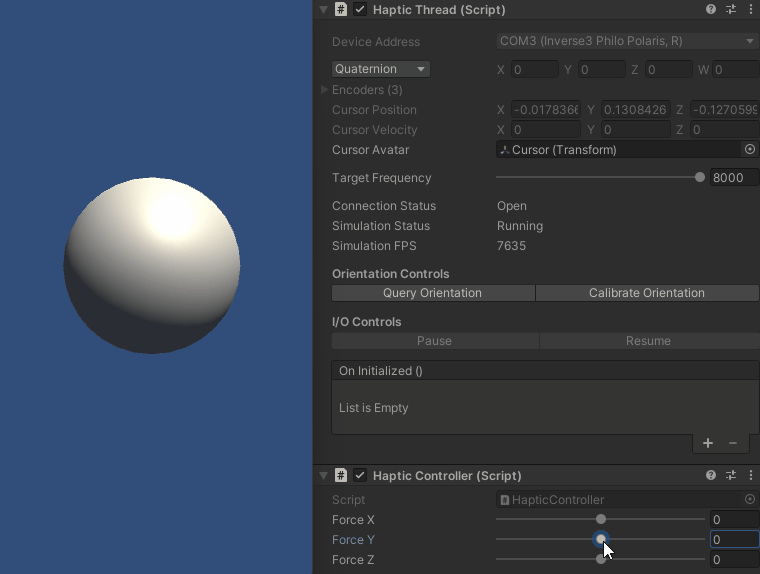
The HapticThread component can control the haptic thread refresh rate using a slider. For best results use a refresh rate of 1KHz or more.
The position provided by the HapticThread is directly measured using position sensors on the device. The velocity, on the other hand, is calculated using a velocity estimation algorithm to provide a signal that you do not need to filter. The HapticThread can also provide information about the device’s power state, base orientation, and other states.
Using a Handle
-
Create an empty Game Object under scene, name it Handle Thread and from the inspector, add the Handle Thread component on it.
-
In the inspector use the Device Address dropdown to select the Handle device matching the name on its tag

-
Add a Cube as child of the Cursor with following Transform values:
- Position :
0, 0, -1 - Rotation :
0, 0, 0 - Scale :
0.5, 0.5, 2
- Position :
-
Attach the Cursor to the Handle Thread’s Avatar property
-
Enter the play mode, the Handle Thread will continuously update the device orientation in the inspector window so moving the handle will rotate the Cursor.
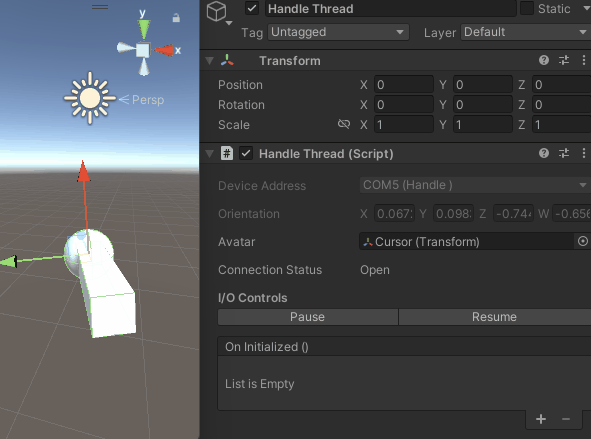
Doing that will update the rotation of the Cursor with Handle orientation while the position will be updated by the Inverse3 effector movements.